Best Ever Pancakes

DSC00189

My children certainly consumed their share of frozen waffles.  They were fast and easy to pop in the toaster and onto a paper plates as we were headed out the door to Sunshine Day Care or Britton SACC.    On the weekends however, we made pancakes from scratch.  They were a staple for sleepovers for sure, but very often we made them just for us.  The cinnamon and vanilla (the vanilla is my only addition to the recipe) made them tasty enough to eat without being drowned in syrup and even back in the 1990’s I thought whole wheat was a plus.  OK sometimes we dropped on a few mini chocolate chips for fun!

The source for this recipe is Pancakes And Waffles by Elizabeth Alston.  I don’t recall where I found this little gem of a cookbook but it has a time honored spot in my collection and it now falls open to page 14 where this stained and spattered recipe for pancakes resides.  In the margins are written quantities for doubling (almost always) and tripling (weekend sleep-overs).  There is also a spot in the instructions where my daughter underlined the directions for combining the wet ingredients and adding them to the dries.   It is almost certainly one of the first recipes that she learned to make on her own.   As testament to this, there is a certain yellow bowl that to this day sports a pour spout from a too close encounter with the electric griddle.  For years after the bowl served as a strainer when pouring off water from shocked green beans etc.  It now has an honored spot in the sauna.

That griddle is also an important contribution  to this recipe’s place as a sleep over institution.  It was a wedding gift from my sister-in law and her husband.  The intended use being, the making of lefse.  If you are not of Scandinavian heritage (as I certainly was not), this is a delightful tortilla like flat bread made primarily of potatoes and flour.  It is a critical component of any true Norwegian or Finnish Christmas feast-especially for those of us who only tolerate the lutefisk.  If you don’t know about lutefisk, consider yourself lucky and if you do you will likely understand what I’m talking about.   At some point I’ll share this time honored delicacy with you (the lefse, not the lutefisk) but it will wait until I have the helpful hands of my daughter, as it is  a project.  In any case I remain grateful to my sister-in-law for introducing me to this awesome piece of cookware.  On this,  you can make pancakes fast enough to keep even the hungriest of sleep over crowds happy.

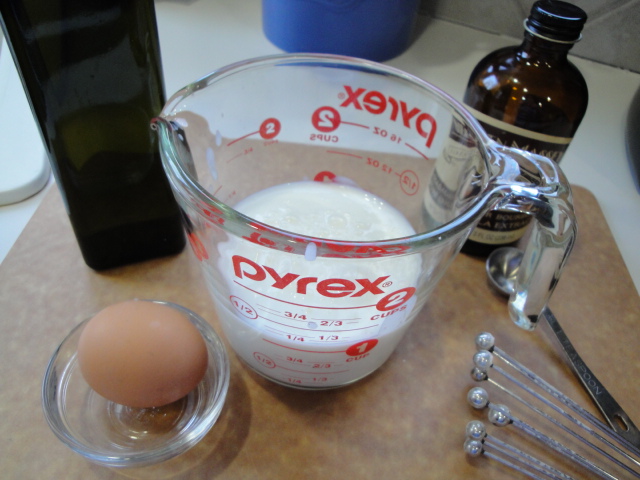
Ingredients : Flour (half whole wheat and half all purpose), sugar, baking powder and soda, cinnamon,salt, buttermilk, egg, vanilla & oil.

DSC00176

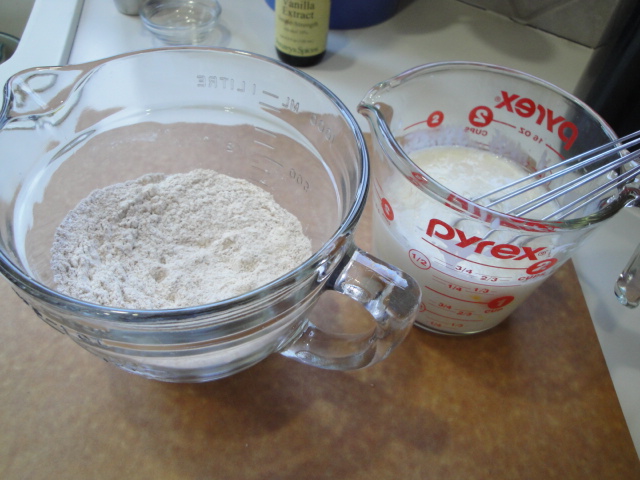
Start by combining the dries-it’s important to mix well.  No one wants to bite into a lump of baking powder or soda. The cinnamon not only adds great flavor but it helps you see that you’ve done a good job of mixing.

DSC00177

Now do the same thing with the wet ingredients.  If you don’t keep buttermilk in your refrigerator you can substitute with a combo of plain yogurt and water, if you don’t have yogurt you can  use milk plus vinegar or lemon juice.  If you don’t have any of these you’ll need to go to a Waffle House.

DSC00181

Sometimes on the eve of a big sleep over party I would do the first two steps ahead and refrigerate the wet mixture.  Then it was just a matter of mixing the two together and heating up the griddle. The batter should be smooth but not over beaten.  If it seems too thick, thin it with a bit more buttermilk or milk.  

DSC00183

How thick is too thick??  This depends on how you like your pancakes, so cook one and adjust-I’ve never had the batter be too thin as written, but have often thinned it just a bit.

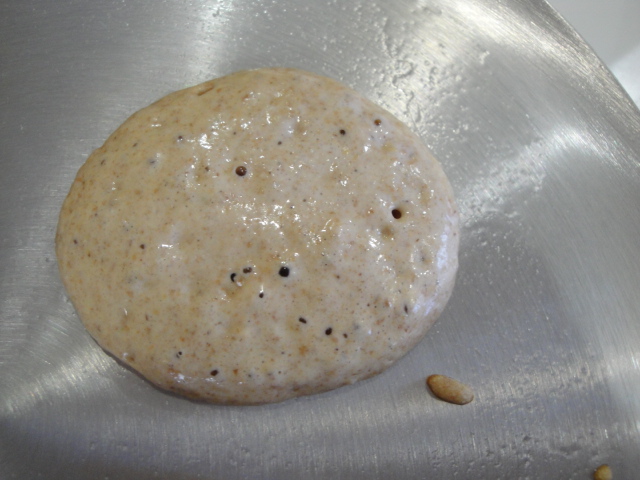
I usually cook one pancake to make sure the temperature of the griddle is perfect and to munch on while I cook the rest.  They are ready to flip when you see these little bubbles forming on the surface and the bottom is nice and brown.  

DSC00187

Resist the urge to smash or flatten the pancakes while you are waiting for them to cook on the second side.  If you must do something with that spatula in your hand, turn the sausage that should be cooking to go along with your tasty cakes.

DSC00188DSC00191

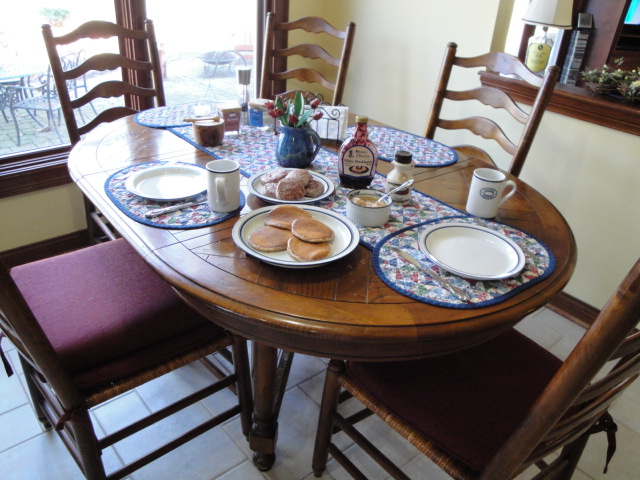
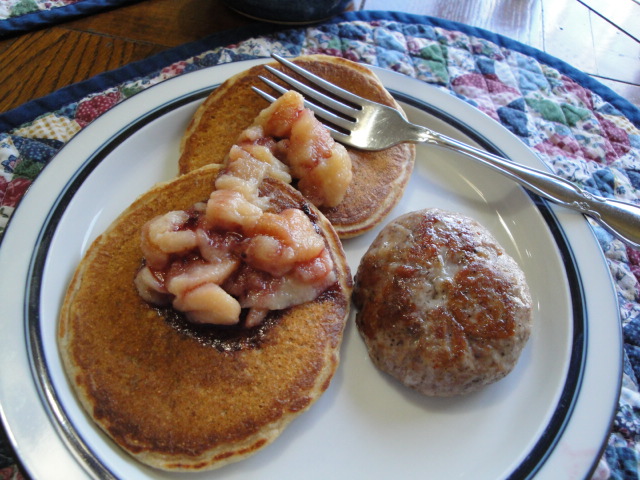
My personal favorite toppings are sautéed apples and a drizzle of berry syrup with a side of sausage but real maple syrup and bacon have a following at my table as well.  Oh and don’t forget the mug of hot Nestlé Quik.

DSC00193

Happy Breakfast-or Lunch or Dinner!

M.B

Best-Ever Pancakes

by: M.B. Einerson

 Adapted just barely from Pancakes And Waffles by Elizabeth Alston 

Servings: approx eight 4-inch pancakes (rarely made just a single batch)

  •  ½ cup all-purpose flour
  • ½ cup whole wheat flour
  • 1 Tbsp. granulated sugar
  • 1 tsp. baking powder
  • ½ tsp. baking soda
  • ¼ to ½ tsp. cinnamon
  • ¼ tsp. salt
  •  1 cup buttermilk, or ¾ cup plain yogurt plus ¼ cup water
  • 1 large egg
  • 1 tsp. vanilla
  • 2 Tbsp. mild olive or vegetable oil
  • Oil for cooking

Combine flours, sugar, baking powder and salt in a large bowl and stir or whisk to mix well.

Measure the buttermilk in a 2-cup or larger glass measuring cup.  Add the egg, vanilla and oil.  Beat with a fork or whisk to blend.

Add the milk mixture to the flour mixture and stir to form a smooth batter.  If the batter seems too thick add a splash more buttermilk or milk.

Heat a griddle or large skillet over moderately high heat until it feels hot when you hold your hand directly above it.  Lightly grease using a silicone brush or a folded paper towel.

For each pancake ladle approximately ¼ cup batter onto the griddle.  Cook until bubbles appear on the surface and the undersides are golden brown.  If your griddle is at the right temperature this will take from 3-5 minutes.  If the pancakes are browning too fast, turn down the heat!!!  Turn the pancakes over and cook 1 to 2 minutes longer to brown on the second side.

Resist the urge to flatten the pancakes with your spatula.

If you are cooking these to order over a span of time, the batter will likely thicken-just add a splash of milk to get it back to the correct consistency.

If you’re cooking some ahead of time to try and keep up with a crowd, keep them warm in a 200°F oven.  Place them on an oven safe plate and cover loosely with foil to keep them moist.

* if you don’t have either buttermilk or yogurt the next best substitute can be made by putting 1 Tbs. vinegar or lemon juice into a liquid measuring cup and filling to the one cup mark with milk.  Stir and let sit until the milk thickens and is acidified.

Manchego & Smoked Paprika Scones- ? English

DSC00132

As promised some scones to go with your soup!

Cheese scones are one of those baked goods that have been on my “to tweak” list for some time.  On that trip to England that I mentioned in the Carrot & Coriander Soup post, we had Raisin Scones and Tea from a food truck on the site of Stonehenge. Once again it was a very cold and blustery day and I wondered if those Neolithic Brits had the comfort of something as satisfying as a warm scone and a cup of hot tea while they were hauling and erecting those gigantic rocks.

DSC00134

My daughter wanted a cheese scone but I convinced her that Raisin were more “authentic” and that I would make her some cheese ones when we returned home.  Why I didn’t let her have her own cheese scone still evades me to this day!! In any case I’ve made quite a few batches of Cheese Scones over the years and there are several in my tried & liked file, but none that ever truly satisfied me.  Many cheese scones contain cheddar cheese and chives. A good combo for sure, but at the moment, Manchego is on my favorite cheese list and smoked paprika is a flavor I enjoy in many dishes these days.  Most important of all however, these are the ingredients I happen to have on hand.   As you will learn as this blog continues, I’m trying hard to eat locally and in season.  So when my chives are buried under snow it’s time to move on to another flavor profile.

Scones are an interesting baked good, with ratios of flour to butter ranging far and wide.  The liquid ingredient can be milk, buttermilk or cream to name a few.  Some have egg and other’s don’t.  One recipe I made just recently, and really enjoyed  contains, butter, egg, heavy cream and ricotta cheese.  This one I’ll share at a later date, but to go with my Carrot & Coriander soup I wanted something  savory with lots of cheese and just a hint of heat.  I’ve done a bit of reading about the difference between American and British scones and to be honest I don’t have a clear memory of that Stonehenge scone,  except that it was mighty tasty.  Will I recognize it if I make it??  I’m not so sure, but I’m willing to try a few more batches of scones to give it a try.  Now I’m not as ambitious as Cook’s Illustrated, so there won’t be a hundred batches to make sure I’ve got a perfect cheese scone.  I’d probably try a few more if I had a few more people around these days to eat and comment on the trials, but Mark and I can only eat so many scones and I hate wasting food!!  So far in this latest quest,  I’ve made two batches of cheese scones with vastly different formulas and methods.  The first one which contained butter and quite a lot of  heavy cream was better than any of the other 3  I had in my files.  Still it wasn’t exactly what I was looking for.  As I continued to read and  research I think it is closer to what is described as an “American type” scone, very buttery and flaky in texture.  I wanted something a bit less fatty but still tender and flavorful.   I was also interested in trying out the method where frozen butter is coarsely grated to eliminate the “cutting in” step.  In theory this would yield a more uniform distribution throughout the dough and allow  me to use a tad less fat.  I also wanted to use buttermilk because I like the tangy, cultured flavor (a boost to the cheese) and the extra lift it gives to baked goods when combined with baking soda.  So, for this post I’m giving you Manchego and Smoked Paprika Scone-2 .  It has all the cheese flavor I was looking for and from what I’ve read, may resemble a British type more closely, hench the ? English Style in the title. They rose light and fluffy with a texture between bread and biscuit.

So give them a try and let me know what you think-especially if you’ve had the good fortune to check out the real thing from the food truck at Stonehenge recently!

M.B.

The Ingredients

DSC00121

The Method

Butter 

As I said I  wanted to give the method of coarsely grating the butter a try, so I pulled out one of my favorite tools, the Microplane grater.  This one is the Extra Coarse model.  It’s always difficult to grate the last bit of anything with out taking a bit of a knuckle or finger, so I took the stick of frozen butter and trimmed away the paper wrapper to reveal the proper measurement (4 Tbsp.) for this recipe.  This left me with a safe and easy way to grate the correct amount without endangering any body parts!

DSC00114 DSC00115 DSC00116

From here I placed the bowl of coarsely grated butter back into the freezer and grated the Manchego cheese using the same grater.  The butter left on the grater helps to keep the cheese from sticking.

Cheese

The standard weight/volume ratio for grated cheese is 4 oz.= 1 cup.  In the case of this type of cheese and this size of grate/shred, I get  3.2 oz. in a fairly packed cup.  Normally I wouldn’t care so much about a bit of cheese here and there, but this is baking!  So if you have a kitchen scale pull it out!

DSC00117

Pre-heat your oven to 400°F

Combine all of the dry ingredients flour, sugar, baking powder, salt and smoked paprika  in a medium to large bowl.  Give them a good whisk or stir.

DSC00122

Next add the grated butter and cheese and chives/green onions/parsley. Stir them together quickly to evenly distribute the butter and cheese.

DSC00123

Stir in the buttermilk using as few strokes as possible to just moisten the dough.  Once you add the buttermilk, the gluten will begin to develop and and the reaction between the acid in the buttermilk and baking soda will begin.

DSC00125

Turn the loose mass out onto a lightly floured surface and knead just enough to pull into a rough ball shape.

DSC00126

Flatten the ball into a disk that is approximately 8 inches round and 1 inch thick. Sorry my hands were pretty sticky so I didn’t get a shot of the ball!

DSC00127

Cut the disk into 8 triangles.  Some scones are rolled and cut with a biscuit cutter, but this requires re-rolling some of the dough.  Not a good idea with this recipe, as you would definitely over develop the gluten and end up with some scones that are much closer to bread than scone.

DSC00128

Place the scones on a parchment paper lined baking sheet, brush with a little more buttermilk and sprinkle with additional smoked paprika.

DSC00129 DSC00130

Bake at 400°F until golden brown.  This will take from 25 to 30 minutes.  Give the baking sheet a full 180° rotation after 10 to 15 minutes in the oven.

These will rise really high and will taste best within a few minutes from coming out of the oven.  The texture will be light, somewhat bread like and most likely different than the scones you are accustomed to eating.

DSC00131

They are great as a side to  the Carrot & Coriander Soup from last week’s post but they are equally good with a little smoked salmon or some scrambled eggs!

DSC00136

Enjoy!!

Manchego & Smoked Paprika Scones -? English Style

by: M.B. Einerson

 Adapted from many Cheese Scone recipes and no one in particular

 Servings: 8 scones

  •  4 Tbsp. frozen unsalted butter, coarsely grated
  • 1 cup (3 oz.) coarsely grated Manchego cheese (sharp Cheddar would be good as well)
  •  2 cups unbleached all-purpose flour
  • 1 Tbsp. sugar
  • 1 Tbsp. baking powder
  • 1 tsp. kosher salt
  • 1 tsp. smoked paprika, plus additional for sprinkling on top
  • 1 Tbsp. snipped chives, minced green onion tops or minced flat leaf parsley (optional)
  •  1 cup buttermilk, plus additional for brushing tops

Preheat oven to 400°F.

Grate the frozen butter using an extra coarse Microplane grater or the largest holes on a box grater. Put back in the freezer while you are prepping the remainder of the ingredients.

Grate the cheese using the same grater (don’t wash in between-the butter remaining on the grater helps keep the cheese from sticking.

Combine the flour, sugar, baking powder, salt and smoked paprika in a medium to large bowl.   Quickly stir in the grated butter and cheese, chives.  Then gently stir in the buttermilk.  Use a light hand here, stirring just to combine the ingredients.

Turn the mixture (it will or should be crumbly and loose) out onto a lightly floured surface and knead a few times to pull it into a ball.  Flatten the ball into a round disk approximately 8 inches in diameter and 1 inch thick.  Cut the disk into 8 triangles.  Place the triangles on a parchment lined baking sheet.  Brush the tops with buttermilk and sprinkle with smoked paprika.  Bake for 25 to 30 minutes or until golden brown.  If your oven is like mine you will want to give them a 180° turn at 10 to 15 minutes.