Pimento Cheese and Toasted Pimento Cheese & Tomato Sandwiches

DSC00833

Before the season ends and I’m back to canned tomato products, one of the things on my summer must eat list is a simple  Toasted Pimento Cheese & Tomato Sandwich.  Some hearty bread, good pimento cheese and a thick slice of vine-ripened tomato are all that’s required for a satisfying lunch or dinner.

Recently I made the food for a fairly large wedding shower/cocktail party.  It was pretty exhausting and made me realize how much caterer’s should be appreciated when they make food from scratch rather than relying on commercially produced stuff to fill their orders.  Good food doesn’t need to be fancy or fussy but it does need to be fresh and prepared with high quality ingredients.  So it wasn’t so surprising to me when one of the most commented on items on my menu was a simple Pimento Cheese Spread served alongside toasted baguette and celery sticks.  So much easier to prepare than the fussy Watermelon Gazpacho with Feta Crema served in martini glasses, and the second bonus was that there were leftovers to be enjoyed the next day while cleaning up after the party.

Pimento Cheese Sandwiches were one of those things I grew up with and found to be just an ok kind of thing,  but it was often made with pasteurized processed cheese, salad dressing, generic canned pimento peppers and slathered onto what I have come to refer to as Wonder Fluff.  It wasn’t until I grew up and discovered aged cheddar cheeses, mayonnaise and roasted Piquillo peppers that  Pimento Cheese became one of those ” sometimes” foods to be savored.   A sometimes food because ,it’s not low in calories, saturated fat  or sodium for sure, but for an occasional meal with homemade whole grain bread and a thick slice of tomato I’ll make the sacrifice and cut those calories somewhere else.

In the past I’ve made this sandwich as a “Grilled” sandwich, meaning that in addition to the fat from the cheese and mayonnaise I added butter to mix as in a Grilled Cheese Sandwich.  So as at least a small  nod to cutting a bit of the saturated fat in the sandwich,  I decided to simply toast the bread and build the sandwich with modest amounts of my lovely Pimento Cheese and an extra thick slice of tomato.  Funny thing is,  I think I liked it even better than my old stand by.   I don’t think it will make it to the pages of Cooking Light but every calorie saved is one I don’t need to burn.

The inspiration for this recipe was Pimento Cheese Toasts that appeared in the January 2008 issue of Gourmet magazine.  I’ve used it for New Year’s Eve and Derby Day parties in it’s original form and then as a cold spread as I mentioned as an easy make ahead item for a cocktail party.  This week I’m just enjoying it made into a sandwich with tomatoes or on toast with a slice of tomato for breakfast.

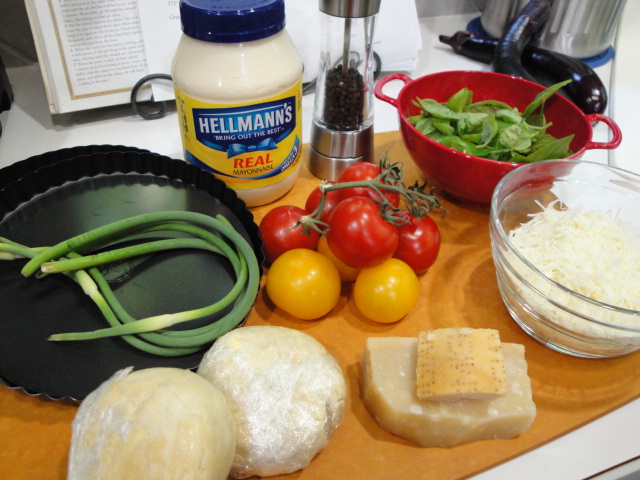
The ingredients for the spread are simple so the quality really counts.  I use a combination of sharp or extra sharp (aged) white cheddar (Cabot Vermont is one of my favorites) and sharp or extra sharp yellow cheddar.  White pimento cheese would just seem weird, so the combo gives me the color I want with the great flavor of an excellent white cheddar.  I’ve replaced the cayenne pepper in the original recipe with chipotle powder and the generic roasted red peppers with roasted Piquillo Peppers.   Only Hellmann’s Real Mayo makes it into my refrigerator. 

DSC00801 - Copy

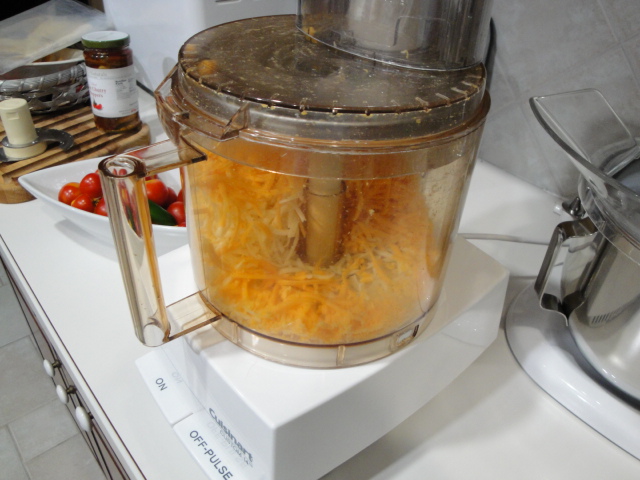
When I’m grating this much cheese I pull out the food processor and the coarse grating blade.  

DSC00805 DSC00808

Pat the peppers dry

DSC00809

Two piquillo peppers with give you approximately 1/4 cup of diced pepper.  If you love the flavor feel free to add a bit more or you can do as I will and add more to the sandwich.

DSC00813

Mix the cheese, mayo, peppers and chipotle or  cayenne pepper ( if you like it spicy up the amount to 1/4 teaspoon or more to taste).  It needs to sit in the refrigerator a bit to allow the flavors to blend, but it’s essentially party ready as a lovely spread at this point.

DSC00816 DSC00818

Now I’m ready to build my sandwich.  This week I was ambitious and made my own bread (Harvest Wheat from the King Arthur website and baked in a Pullman pan so I have great sandwich slices.  

DSC00822

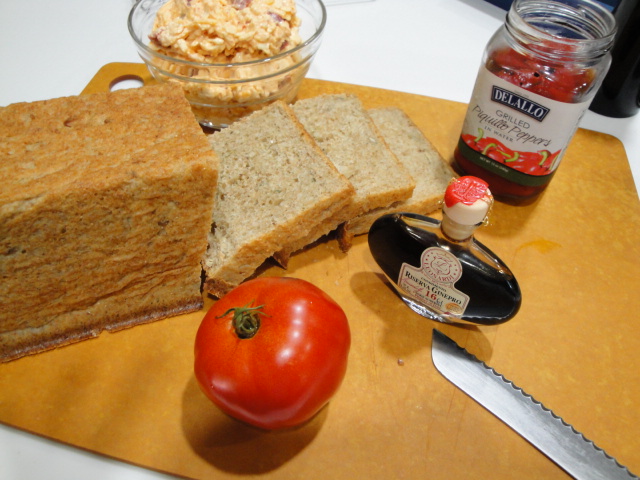
More piquillo pepper patted dry, a thick slice of vine ripened tomato and a splash of awesome Lombardi Balsamic Vinegar.

DSC00823 DSC00824

I have a new toy  in my kitchen (a Wolf countertop oven that works as a toaster) that makes making a toasted sandwich super easy.  The bread toasts and the cheese gets just slightly warm.  If you simply toast two slices of bread and work quickly you can achieve nearly the same effect.  Or you could dry toast the sandwich in a skillet.

DSC00826

Toasted bread and warm gooey cheese-oh yum!

DSC00827

All I need for lunch is a few more slices of those luscious vine ripened tomatoes from my garden.

DSC00837

Enjoy!

M.B.

Pimento Cheese

by: M.B. Einerson

Adapted from Pimento Cheese Toasts Gourmet Magazine January 2008 

Servings: approximately 2 cups – enough for 6 to 8 sandwiches or 36 hors d oeuvres on baguette slices

  • 10 oz. sharp or extra sharp Cheddar cheese, coarsely grated (I like a combo of white and yellow cheddar
  • ⅛ to ¼ tsp. chipotle powder or cayenne pepper
  • ⅛ tsp. freshly ground black pepper (optional)
  • ¾ cup mayonnaise
  • ¼ cup finely diced roasted Piquillo peppers, patted dry before dicing.

Mix all ingredients and refrigerate until ready to serve.

Serve with celery stalks or toasted baguette slices or spread on baguette slices and broil until the cheese is bubbling and browned.

Turn into a toasted sandwich with a hearty wheat bread, tomato slices and extra Piquillo peppers


Enjoy,

M.B.

Tomato and Cheese Tart

DSC00632

To celebrate one of the first days we’ve been able to sit on the patio for a while I decided to make a long time favorite Brunch/Appetizer-Tomato, Basil & Cheese Tart.   It doesn’t exactly fit into the healthy category, but as long as the portions are small and it’s accompanied by a light green salad (I actually didn’t even put any dressing on my lettuce and tomatoes) it’s a fine way to celebrate a beautiful  Sunday in July.

The recipe comes from one of my friends in the neighborhood and has been served at many a party by both of us.  In fact,  until writing this post it was always referred to as Colleen’s “Quiche”. How it ever got that name I don’t recall,  as the only eggs that make an appearance in it come via the mayonnaise that binds the cheeses in the filling.  It does have a bit of a quiche-like appearance however with its lovely golden brown crust and top of melted cheese, so perhaps it can be considered a distant cousin of that other fabulous brunch dish.

In any case it’s definitely worth giving a try when the garden is filled with basil and the tomatoes are bursting with flavor.  I’m thinking that I may even revisit it later this summer and turn it into a BBT & C  (Basil,Bacon,Tomato & Cheese) tart.  Because as I was enjoying it for brunch this morning it occurred to me that the only thing that could make it even more tasty would be a bit of crispy bacon in the mix.  All things in moderation of course, so I’ll wait a while before indulging in that!

The first thing you may notice are some things on the left,  that from afar resemble curled green onions with no white end.  They are garlic scapes, that today I’m substituting for the garlic in the recipe.  They are one of the harbingers of spring at the local farmer’s markets and they have an amazingly long shelf life if you store them in a plastic bag in the refrigerator.  If you ever see them be sure to give them a try. 

DSC00607

I almost always have an extra disk of pastry dough in the freezer, so won’t be making any today.  If you are in a rush I suppose you could use one of the pre-made kind, but homemade is so much better and it’s really easy once you get the hang of it.

 The dough I currently have  is a 1/2  of a recipe for a single crust pie, left over from some classes I teach, so I’m down sizing the tart today and using an 8 inch tart pan instead of the 9 to 10 inch that the recipe is written for.   I like to use this size when I’m making this as an appetizer because it gives nice little small slices and I’m a big believer in small quantities of things that taste great!  

In any case it’s an easy recipe to adjust as exact quantities of ingredients aren’t critical to success.

DSC00609

Roll the crust to approximately 1/8 inch thick and 2 inches in diameter larger than the tart pan or pie plate.

DSC00610

Roll the dough over the rolling-pin and transfer to the center of the tart pan.  Once it’s in place, gently roll the excess crust to the inside of the pan and press into the ridges.  Be careful not to pull or stretch the dough.

DSC00611DSC00612

With the dough in place, line the crust with foil and fill with pie weights.  I keep a bag of beans in my pantry for this.  Just don’t ever try to cook them after they’ve been serving as pie weights as they will never be anything but bean rocks.

DSC00614

Bake the crust with the pie weights in a 450° F oven for  8 to 10 minutes.  Remove the foil and beans and dock (prick) the entire surface of the crust with a fork.  Return the crust to the oven and bake for another 2 to 4 minutes or until it is lightly browned.  If the crust puffs up, gently press down with the fork to release the steam.  This is called blind baking the crust.  It helps keep the crust from becoming soggy during the final baking.

DSC00616DSC00617

Set the crust aside to cool and reduce the oven temperature to 375°F.

Now you’re ready to prep the filling.  Grate the parmesan, shred the mozzarella, thinly slice the tomatoes (if you want you can put them on a paper towel to soak out some of the extra juice), mince the garlic scapes or garlic and chiffonade the basil. 

DSC00626DSC00618DSC00619DSC00620DSC00621

Sprinkle the bottom of the cooled crust with approximately 1/3 of the mozzarella (1/2 cup if you’re making an 9 or 10 inch tart).  Top with tomato slices, basil and minced garlic or garlic scapes.

DSC00622 DSC00623DSC00625

Mix the remaining shredded mozzarella, grated parmesan cheese, the mayonnaise and some freshly ground black pepper and spread over the top of the tart.  Don’t worry if the mixture is thick and won’t spread evenly, it will melt and spread as it bakes.

DSC00627 DSC00628

Bake for 30 to 40 minutes or until golden brown.  You will want to place it on a baking sheet or place foil on the rack under the tart to catch any butter that drips from the tart pan as it bakes.

My favorite trick for removing the rim of the tart pan is to set it over a can and let it gently fall to counter.

DSC00630 DSC00631

Garnish it with a bit more fresh basil and you have a lovely hors d’oeuvre for a summer party or a great brunch dish that only needs a bit of fresh salad. 

DSC00634

DSC00633

The tart was so rich and tasty I didn’t even add any dressing to my salad.  But in hindsight a splash of balsamic would have been lovely.

DSC00636

Bon Appétit!

M.B.

Tomato, Basil & Cheese Tart

Colleen’s “Quiche”

by: M.B. Einerson

Adapted from a recipe given to me by  Colleen 

 Servings: 12 appetizer servings or 4 to 6 entrée servings

  • Pastry for a single 9 to 10 inch pastry crust rolled fit pie plate or tart pan it should be approximately 1/8 inch thick and have a ½ inch overhang
  • 1 ½ cups shredded mozzarella cheese, divided
  • 5 to 6 Roma or small round tomatoes or the equivalent in cherry or grape tomatoes
  • 2 to 4 cloves garlic minced or two garlic scapes thinly sliced.
  • 1 cup loosely packed fresh basil leaves, sliced into a chiffonade, plus more for garnish
  • ½ cup mayonnaise
  • ¼ cup shredded parmesan cheese
  • Freshly ground black pepper to taste

Preheat oven to 450°F

Place unbaked crust in a 9 or 10 inch pie plate or tart pan with removable bottom.  Turn the overhang under and flute or press into the sides of the tart pan.  Line with foil and fill with pie weights.  Bake for 8 minutes.  Remove foil and pie weights, dock the entire crust with fork pricks and bake an additional 2 or so minutes more, until lightly browned.  I the crust has puffed, gently press down with a fork or spoon.  Set aside to cool.

Reduce oven temperature to 375° F.

Cut the tomatoes into thin slices, wedges or halves depending on the type you are using.  You can drain on paper towels if you like but I love the flavor of the juice, so I sacrifice a bit of crispy texture for bigger flavor.

Sprinkle the bottom of the cooled crust with ½ cup of the mozzarella.  Top with tomatoes, garlic and basil ribbons.

Mix the mayonnaise, remaining 1 cup of mozzarella, shredded parmesan cheese and black pepper.  Spread this mixture over the top of the tomatoes.  Don’t worry if it’s a bit thick and won’t spread smoothly or evenly.  As the cheese melts it will spread over the tart.

Bake for 30 to 40 minutes or until golden brown on top.  Cool slightly and serve warm or at room temperature.

Bon Appétit

M.B.


Camembert Souffle

DSC00599

When I think of this Camembert Soufflé it brings up great memories of brunch on the  gazebo.  At our first home in Southern California we had a beautiful gazebo in the back yard that was the perfect spot for brunch nearly year round and this soufflé was one of my favorite brunch dishes to serve.   Not only was it tasty( the best description I can think of is that it’s like eating a cloud), but I loved the challenge of getting it out to the table before it began its fall from glory.

Needless to say this type of challenge was something I relished before kids arrived on the scene, took over the Gazebo as a playhouse and gave me other challenges.  So it is highly likely they have no memory of it at all.  However , it was always one of their Father’s favorite egg dishes, so in honor of Father’s Day I decided to pull it from the files.   The perfect complements to this dish are a great Bloody Mary (my husband’s department) and a simple green salad lightly dressed in a slightly sweet and tangy vinaigrette.  The bite of vodka and spice in the Bloody Mary, the crunch of the celery stick and the freshness of the salad balance the richness of the soufflé perfectly.

So in honor of Father’s Day I give you Camembert Soufflé.  It was the perfect brunch item to enjoy before the father of my two wonderful children settled in to enjoy the US Open.

Eggs, butter, cheese, milk, a bit of flour, some aromatics and a bit of technique are all that Camembert Soufflé requires.

DSC00554

Start the process of making this cloud of an entrée by separating the eggs.

Eggs are easiest to separate when cold but whip best when warm-so when making anything that requires beating egg whites to a foam,  pull them from the refrigerator, separate them immediately and then proceed with the rest of the recipe.

DSC00558

The other key to success when separating eggs is to use a minimum of 3 bowls.  One bowl to separate over, one bowl to hold the yolks and one bowl for the whites.  In this recipe I used 4 bowls because it uses a total of 7 whites and 5 yolks.  Choose a large bowl for the 5 yolks.

Next preheat your oven to 350° F.  Make sure you have the racks positioned with enough room to allow the soufflé to rise to its max.

Prep your soufflé dish (a minimum volume of 2 quarts) by buttering liberally and sprinkling with finely grated parmesan cheese.  Think of the cheese as a rock climbing wall-it gives the rising soufflé something to hang onto as it begins its ascent up the sides of the dish.   It also give a nice little cheesy crust on the side of the soufflé.  To insure that the “rock wall” is solid-pop the coated dish into the refrigerator while you continue with the recipe.

DSC00552 DSC00553

Next prep the rest of the cheese.  As with eggs, the camembert will be easier to deal with when it’s cold, especially if you have a nice soft, ripe one.  The Parmesan on the other hand is easier to grate when it’s warm.  

Cheese quantities are always tricky, so I usually pull out my kitchen scale.  I used 5 oz. from and 8 oz. wheel of Camembert (we like the rind with a bit of cheese attached to munch on).  In the case of grated Parmesan, my volume measurements never agree with the standard weight to volume listed in most recipes.  In this case I used 1 oz. of finely grated cheese which was approximately 3/4 cup (not the 1/2 cup = 2 oz. that seems to be the standard).  It all depends on the grating, the dryness of the cheese and how tightly you pack the cup.  So weigh it if you can, if not 1/2 cup (tightly packed) to 1 cup (very loosely packed) Parmesan will be fine!

DSC00571

Now for the aromatics.  In this recipe they need to be finely diced.  The easiest and fastest way to dice celery is to make thin slices along the length of the stalk and then thinly slice.  If the scallion/green onion is thin enough simply slice thinly, if it’s a fat one use the same technique you used for the celery.

DSC00564DSC00566

Melt the butter in a heavy-bottomed pot and add the celery, onion and garlic (as always garlic goes in last).  Sauté until the celery is soft and the onion is translucent-do it on low so the butter doesn’t brown.

DSC00567 DSC00568

Stir in the mustard and flour and pepper to make a roux.  Cook for just a few minutes to cook out the raw flavor of the flour, but you want a very blond roux, so again low heat and a heavy pot are key.

DSC00569 DSC00570

Whisk in the milk and cook until thick and bubbly.  

DSC00573

Add the cheeses and whisk until all are melted.  Then remove from the burner and set aside to cool slightly.

DSC00574

Now back to those eggs that have had a chance to warm up.  Be sure to use a large bowl for beating the egg yolks as it will need to hold all of the soufflé mixture. 

DSC00575

Beat the yolks until they are thick and light in color.  This will take approximately 5 minutes with a good hand mixer.

DSC00577

Slowly add the cooled cheese mixture to the beaten egg yolks, whisking as you go (if your cheese mixture is too hot you will get scrambled yolks instead of soufflé base)

DSC00579

Now beat the egg whites to stiff but not dry peaks.  I was concerned that I had gone a bit far with these, but you’ll see in the end, they were nearly perfect!

DSC00578DSC00580

Fold the whites into the yolk/cheese sauce mixture in 1/3 increments.  In the addition of the first third you can be a bit aggressive with the folding but with the 2nd and 3rd additions, fold gently.  Down through the middle, up and over, give the bowl a quarter turn and do it again until combined.  Err on under rather than over mixing.  A few spots of egg white are fine.

DSC00581

Pour the mixture into the prepared soufflé dish.   With a thin spatula or table knife, trace a 1 inch deep circle through the mixture approximately 1 to 2 inches from the edge of the dish.   Gently place in the preheated oven and bake for 40 minutes without opening the oven door.  Hopefully you have a glass door and a light so you can see the magic happening.  

DSC00583

While the soufflé is baking set the table, make a salad and a batch of Bloody Marys -soufflés wait for no one!

DSC00597

At the end of the 40 minutes, carefully open the oven door and if the stuff is tall and nicely browned take it to the table. The original recipe says to check for doneness by inserting a knife in the center while the soufflé is still in the oven but if it looks like this go for it.

DSC00599

Ok so the recipe says that it serves 6, but this is what we had left between the two of us!   When you’re eating a cloud on Father’s day I guess it’s ok !

DSC00604

I think I’ll work on a downsized version soon.

Bon Appétit

M.B.

CAmembert Soufflé

by: M.B. Einerson

Adapted from a recipe in my files that appears to be from a Better Homes and Gardens cookbook circa 1980’s, an updated but similar version can be found on the BH&G website but I still gave it a few tweaks of my own.

 Servings: 6

  • 5 egg yolks – in a large bowl
  • 7 egg whites – in bowl of a stand mixer or a separate metal or glass bowl.
  • 5 oz. camembert cheese*, rind removed and cut into small pieces
  • ½ to 1 cup* grated Parmesan or Romano cheese plus additional for preparing baking dish
  • 3 Tbs. butter
  • ¼ cup finely chopped celery
  • 2 Tbs. thinly sliced green onion
  • 1 small clove garlic, minced
  • 3 Tbs. all-purpose flour
  • 1 tsp. dry mustard
  • Several grinds of black or white pepper
  • 1 cup milk (whole preferred)

Separate the eggs and allow them to come to room temperature.

Butter and sprinkle the sides and bottom of a 2 to 2 ½ quart soufflé dish with finely grated fresh Parmesan or Romano cheese.

Pre-heat oven to 350° F.

Melt butter in a medium size sauce pan.  Add celery, onion and garlic and cook until onion is translucent.  Stir in flour, dry mustard and black pepper and cook for a few minutes on low heat just to cook out the raw flavor of the flour (do not allow to brown).  Add milk all at once and cook and stir until the sauce is thick and bubbly.  Add camembert and grated cheese, stirring to melt.  Remove from heat and set aside to cool.

In a large bowl, beat the egg yolks for 5 minutes or until thick and light in color.  Slowly add the cheese mixture to the yolks, stirring constantly.  Set aside.  Wash beaters well if using them in the next step.

Beat egg whites to stiff peaks.  Fold the whites into the yolk/cheese sauce mixture in 1/3 increments.  In the addition of the first third you can be a bit aggressive with the folding but with the 2nd and 3rd additions, fold gently.  Down through the middle, up and over, give the bowl a quarter turn and do it again until combined.  Err on under rather than over mixing.  A few spots of egg white are fine.

Pour the egg mixture into the prepared soufflé dish.  With a thin spatula or table knife, trace a 1-inch deep circle through the mixture about 1 inch from the edge of the dish.

Bake for 40 minutes or until a knife inserted near the center of the dish comes out clean.  Do not open the oven door during baking.  Test for doneness at the end of the suggested baking time while the soufflé is still in the oven.

Serve immediately as the soufflé will begin to fall as soon as it comes from the oven.

Bon Appétit

M.B.

* Cheese quantities are always tricky, so I usually pull out my kitchen scale.  I used 5 oz. from and 8 oz. wheel of Camembert (we like the rind with a bit of cheese attached to munch on).  In the case of grated Parmesan, my volume measurements never agree with the standard weight to volume listed in most recipes.  In this case I used 1 oz. of finely grated cheese which was approximately 3/4 cup (not the 1/2 cup = 2 oz. that seems to be the standard).  It all depends on the grating, the dryness of the cheese and how tightly you pack the cup.  So weigh it if you can, if not 1/2 cup (tightly packed) to 1 cup (very loosely packed) Parmesan will be fine!