Fruit Cobbler

DSC00684

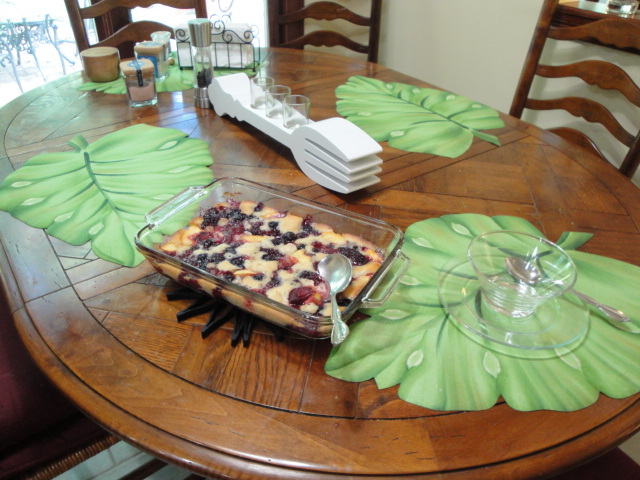
It’s been a busy few weeks with little time for taking pictures or writing but this morning I realized I had both a little time and several bits of fresh fruit from my Great River Organics CSA  (Community Supported Agriculture) on hand and Fruit Cobbler  popped into my mind.  The recipe is based on one I got from a good friend and former colleague Carrie Sears.  It’s with her that I first experienced the joys of CSA membership.  We shared a Wayward Seed CSA share for several years and not only was it great to  enjoy the fresh, locally grown produce but we also got to share recipes and ideas of what to do with our bounty.   On one particular week we were discussing what to make with the lovely plums we had just gotten in our bag and she told me about the Fruit Cobbler she made.   This version of Cobbler  is much easier than the Cobblers I grew up with which consisted of a large rectangular pan of fruit topped with a pastry crust.  Not that making a pastry crust is time consuming or difficult but this type of cobbler is even easier and ever so tasty.  So when you have a bit of extra fruit on hand and are craving something sweet, this could be on your table too.

The ingredients are likely things you have in the pantry and refrigerator already.  Sugar &  spice, flour, butter, milk, baking powder, vanilla, a pinch of salt and the random fruit you have hanging around.  I didn’t find any evidence of it,  but my logic tells me it could have been called cobbler because  the early British settlers made it from what could be cobbled together from the ingredients and equipment on hand.  This would explain why there are so many different styles and versions of the same type of dish.  Some have a pastry crust, some a biscuit or scone like topping and some a simple cake or pancake like batter like this one.    The thing they all share in common is that they taste great and are simple to prepare.

DSC00667

Preheat the oven to 350°F and melt the butter in the dish you will use for baking.  Today I’m using a rectangular baking dish but a 9 or 10 inch pie plate would work as well and would force the batter to rise over the fruit a tad higher.

DSC00672

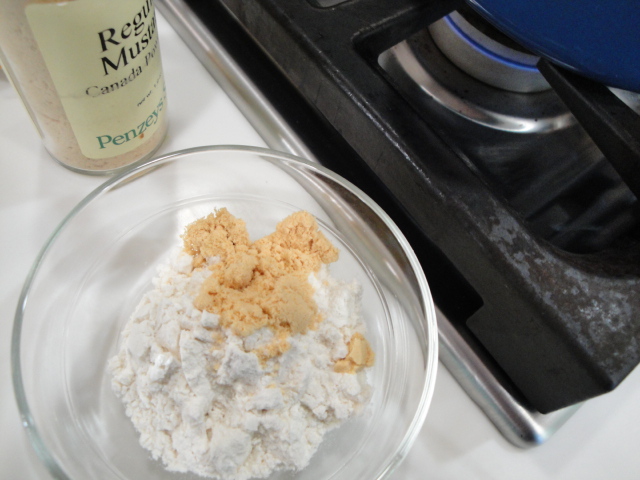
Mix the flour, sugar, baking powder, salt (if you are using unsalted butter) and warm brown spice of your choosing in a small to medium sized bowl.  Today I chose coriander because I love it’s faint citrusy character, but cinnamon, nutmeg or allspice would be great as well. 

DSC00669

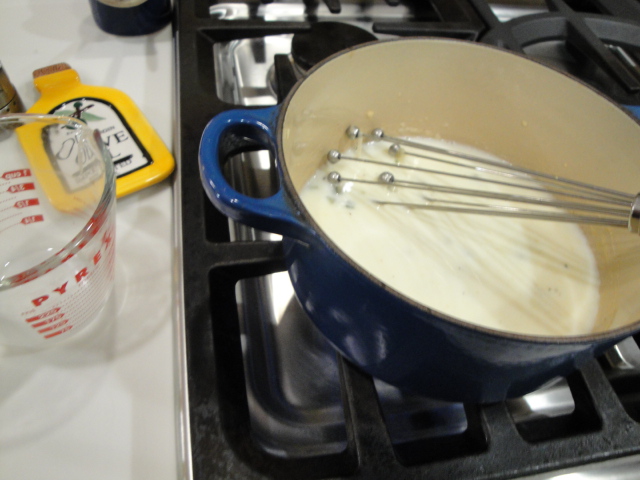
Add the vanilla to the milk.

DSC00670

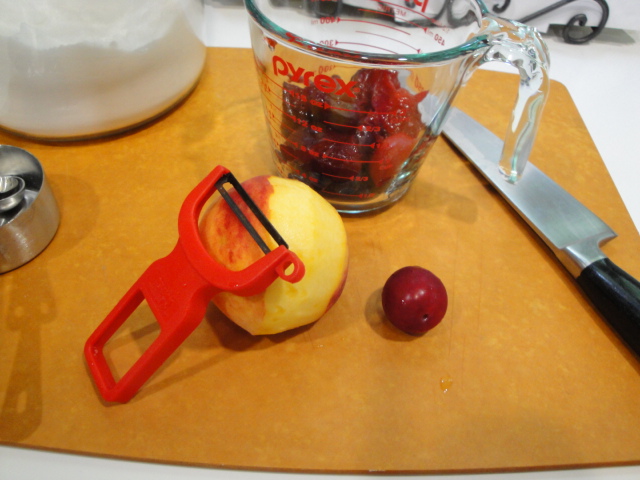
Prep your fruit.  Today I’m using a some blueberries, plums, a peach and a few blackberries.  The total amount should be 2 to 2 1/2 cups of bite size fruit pieces.

DSC00676 DSC00677

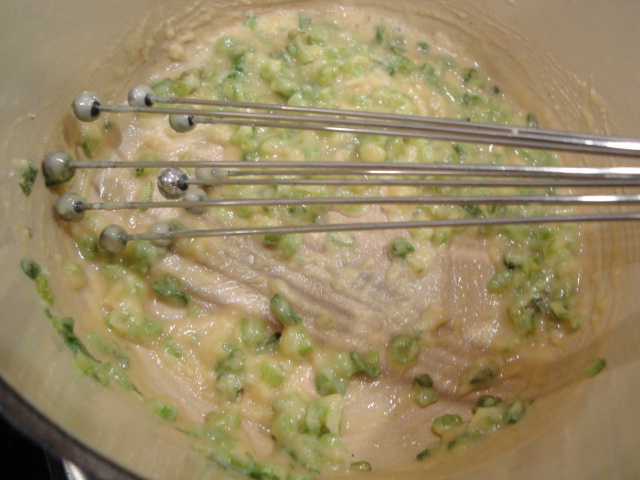
Whisk the milk into the flour mixture.  

DSC00678

Pour the batter over the melted butter-do not stir.

DSC00679

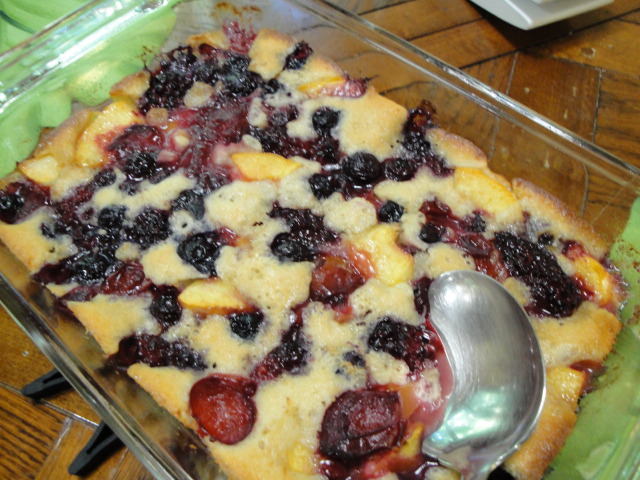
Arrange the fruit pieces evenly over the batter and again do not stir.  

DSC00681

Bake for approximately 45 minutes or until the fruit is nice and bubbly and the batter mixture had turned a golden brown.

DSC00686

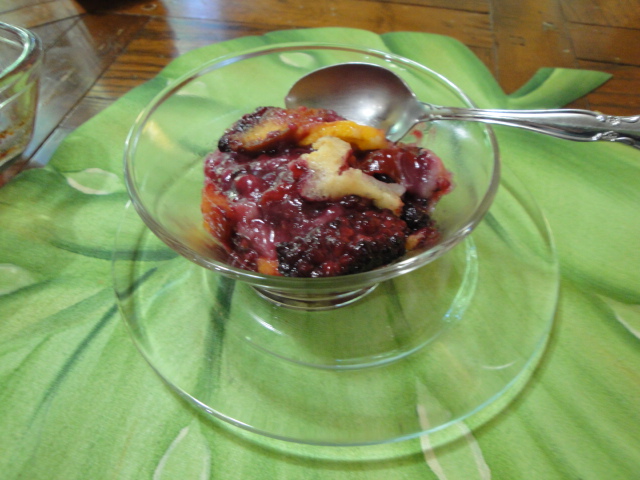
Serve it warm as is or as as I like it with a little splash of heavy cream.    Whipped cream or vanilla ice cream are great as well, but this was my breakfast.   I guess I could have gone with a dollop of lowfat yogurt but I do so love Snowville creamery heavy cream!!

DSC00687DSC00690

Enjoy!

M.B.


Fruit Cobbler

by: M.B. Einerson

Adapted from a recipe given to me by my good friend and former colleague Carrie Sears

 Servings: 4 to 6 (but easily doubled in a 9 x 13 baking dish to serve 8 to 12)

  • ¼ cup unsalted butter (if using salted omit the salt in the recipe)
  • ½ cup all-purpose flour
  • ½ cup granulated sugar
  • 1 tsp. baking powder
  • ¼ tsp. warm brown spice (I like coriander for its slightly citrusy character but cinnamon or nutmeg or allspice are great as well depending on the type of fruit you are using).
  • ½ cup milk
  • ½ tsp. vanilla
  • 2 to 2 ½ cups fruit, in bite size pieces – any single or combination you like, plums and peaches are two of my favorites.
  • ¼ cup granulated sugar (optional-it really depends on how sweet and ripe your fruit is and how sweet you like your cobbler, it will give a nice crunch to the top as well)

Preheat oven to 350°F.  Place the butter into a glass pie plate or 8 x 11 or smaller glass baking dish and place in the oven to melt.  The larger the dish the less the batter will rise up to cover the fruit.

Mix flour, sugar, baking powder and spice and set aside.  Add vanilla to milk and set aside.

Prep the fruit if needed.  If you’re using blueberries, raspberries or blackberries etc. your good to go.

Whisk the milk into the flour sugar mixture until smooth and pour over the melted butter, but do not stir.  Distribute the fruit evenly over the batter and again do not stir.  The fruit will settle into the batter as the cobbler bakes.  Bake until the fruit is bubbly and the batter is golden brown, this should take approximately 45 minutes.

Serve warm as is or with some heavy cream, whipped cream or ice cream on top.

Enjoy!

M.B.


French Green Bean & Roasted Potato Salad

DSC00658

At long last my table is filling with the bounty of locally grown produce.  To celebrate I’m going to make  French Green Bean & Roasted Potato Salad.  The recipe comes from one of my favorite non-profit organizations Local Matters and stars green beans grown in my front yard along with new red potatoes and crispy romaine lettuce from my Great River Organics CSA market bag.

This post will give you a bit of an idea of a few of the things I enjoy besides cooking in my kitchen and writing for this blog, but rest assured they don’t fall far from the tree.

The first is as a volunteer for Local Matters (http://local-matters.org/).  This local non-profit does incredible things in the Columbus community and beyond to positively impact our food system and I’ve been volunteering with them for over 5 years now.  The first thing that got me hooked as a volunteer for them was the fact that they were going into pre-schools  and teaching kids and teachers about  recipes like this that came from various parts of the world.  So fun and rewarding to see food that didn’t come through a drive-through or from a box bring a smile and request for more!

In the time since I first started volunteering with them,  the number and types of programs Local Matters offers has grown dramatically. They literally reach from garden to table  and the impact they have on individual’s food choices and culinary skills among the myriad of other things is truly amazing.   My joy in volunteering for them however doesn’t stop at the important work they do.  It gives me the chance to work alongside  wonderful like-minded individuals such as their executive chef Laura Robertson-Boyd who first shared this recipe with me.

My other main ” volunteer”  gig is as a bag packer for Great River Organics CSA (http://www greatriverfarms.org).  Each week my husband and I get a first  peek at the goodies that will be delivered to a growing number of individuals in the Columbus area who choose to eat produce that  is locally and organically grown by a group of farmers that care about providing superior products, rewarding those in the time-honored profession of farming and respecting our environment.   In the literal sense we work for food because at the end of our shift we go home with some of the best produce to be found in Columbus.   Having grown up on a family farm where most of the food on our table came from our garden and pastures, I love the challenge/opportunity of creating great meals from the things that Great River Organics and I grow.   The other bonus of this gig, like my Local Matters work,  is that it allows me to work with yet another group of amazing people.  One of them is so amazing that she invited us to join a group of her friends on a cultural and culinary adventure to Italy last year.  I’ll save this story for another post(s)!

But back to the subject of this post.  This week I was able to harvest just enough green beans from my front-yard garden (I’m slowly but surely replacing things that are just ornamental with plants that either the bees and I enjoy) to go with the lovely new red potatoes and romaine lettuce from my Great River Organics bag.   Lunch just doesn’t get much better than this – at least until the vine-ripened heirloom tomatoes and sweet corn come along!

As with many great recipes, the list of ingredients is short which means that each one gets to shine and the quality is extra important.  So head to the farmers market or your garden and choose the freshest produce possible.  In my case I only have to step outside my front door for the beans.

 DSC00639DSC00661
New red skin potatoes get a medium dice, a splash of olive oil and a sprinkle of kosher salt. 
DSC00640
Then into a a 425° F oven or 400°F convection oven to roast until just tender and lightly browned.  They will tend to stick a bit to the foil, so use a gentle touch to stir/ flip them about half-way through the cook time.  Resist the temptation to eat them all as soon as they come from the oven.   
DSC00643
While the potatoes are roasting, blanch and shock the green beans.  Don’t forget to salt the blanching water and have your bowl of ice water ready for the shock.  I like to use a salad spinner as my shocking vessel because it allows me to drain the beans easily and give them a spin to remove the excess water.  Beans are ready for the plunge into ice water when they are bright green and tender to the bite.  
DSC00644 DSC00647
Next the vinaigrette.  Today I’m using a country style Dijon because it’s what I have in the refrigerator.   My personal favorite brand is Maille, probably because I had the good fortune to visit Dijon many years ago and bring home a pot of fresh mustard.  So each time I use this mustard I’m reminded of the beauty and great food to be found in the French country side and the wonderful people I met there.
The process of making a vinaigrette is simple.  Whisk the mustard and vinegar together,  then  slowly drizzle in the olive oil as you continue to whisk.   At end,  season with a little freshly ground black pepper.  
DSC00648DSC00649
Finely mince a shallot (if you don’t have a shallot some onion will do) and sauté in a bit of olive oil until translucent.
DSC00650 DSC00653
Toss in the green beans and potatoes and heat until just warm.  Add the fresh tarragon or parsley ( tarragon is definitely the classic flavor for this dish, but try as I might, it is just “not my favorite” so I substitute flat leaf parsley).   Add the vinaigrette and give it another toss to combine. 
DSC00655
Plate on a bed of sturdy lettuce and lunch is served.  
DSC00660
 Bon Appétit and pat yourself on the back for a job well done!
M.B.

French Green Bean & Roasted Potato Salad

by: M.B. Einerson

Barely adapted from a Local Matters recipe by Chef Laura Robertson-Boyd, Executive Chef 

 Servings: 2 main course or 4 side dish

  • ¾  lb. of redskin potatoes, medium dice
  • 1 Tbs. extra virgin olive oil
  • Kosher salt
  • ½ lb.  green beans, snapped into ½ inch pieces (haricot vert are classic for the dish but any fresh green bean will be fine)
  • 1 tsp. Extra Virgin Olive Oil
  • 1 small to medium shallot, minced
  • 1 Tbs. fresh tarragon leaves or flat leaf parsley (optional)

Vinaigrette              

  • 1 ½ tsp. Dijon mustard
  • 1 ½ tsp red wine vinegar
  • 2 Tbs. extra virgin olive oil
  • Kosher salt
  • Freshly grd. Black pepper
  • 4 cups Romaine or other sturdy lettuce, torn (optional but highly recommended )

Pre-heat oven to 425°F.   Toss diced potatoes with 1 Tbs. extra virgin olive oil and kosher salt.  Spread in a single layer on a foil lined baking sheet and roast for 30 to 40 minutes or until just tender and lightly browned.   Stir once, half-way through the cooking time.

Blanch green beans in salted boiling water until just tender and immediately plunge into a bowl of ice water to stop the cooking.  This is called blanch and shock.

In a bowl, whisk the mustard and vinegar together. Slowly whisk in the olive oil.  Add a pinch of salt and freshly ground black pepper.

Sauté the shallots in 1 tsp. extra virgin olive oil in a skillet that will also hold the beans and potatoes.  When the shallots are translucent, add the cooked beans, roasted potatoes and a pinch of kosher salt.  Heat until just warm.  Add the fresh tarragon or parsley leaves.  Stir in the vinaigrette.  Serve warm or at room temperature on a bed of lettuce.

Bon Appétit
M.B.

Tomato and Cheese Tart

DSC00632

To celebrate one of the first days we’ve been able to sit on the patio for a while I decided to make a long time favorite Brunch/Appetizer-Tomato, Basil & Cheese Tart.   It doesn’t exactly fit into the healthy category, but as long as the portions are small and it’s accompanied by a light green salad (I actually didn’t even put any dressing on my lettuce and tomatoes) it’s a fine way to celebrate a beautiful  Sunday in July.

The recipe comes from one of my friends in the neighborhood and has been served at many a party by both of us.  In fact,  until writing this post it was always referred to as Colleen’s “Quiche”. How it ever got that name I don’t recall,  as the only eggs that make an appearance in it come via the mayonnaise that binds the cheeses in the filling.  It does have a bit of a quiche-like appearance however with its lovely golden brown crust and top of melted cheese, so perhaps it can be considered a distant cousin of that other fabulous brunch dish.

In any case it’s definitely worth giving a try when the garden is filled with basil and the tomatoes are bursting with flavor.  I’m thinking that I may even revisit it later this summer and turn it into a BBT & C  (Basil,Bacon,Tomato & Cheese) tart.  Because as I was enjoying it for brunch this morning it occurred to me that the only thing that could make it even more tasty would be a bit of crispy bacon in the mix.  All things in moderation of course, so I’ll wait a while before indulging in that!

The first thing you may notice are some things on the left,  that from afar resemble curled green onions with no white end.  They are garlic scapes, that today I’m substituting for the garlic in the recipe.  They are one of the harbingers of spring at the local farmer’s markets and they have an amazingly long shelf life if you store them in a plastic bag in the refrigerator.  If you ever see them be sure to give them a try. 

DSC00607

I almost always have an extra disk of pastry dough in the freezer, so won’t be making any today.  If you are in a rush I suppose you could use one of the pre-made kind, but homemade is so much better and it’s really easy once you get the hang of it.

 The dough I currently have  is a 1/2  of a recipe for a single crust pie, left over from some classes I teach, so I’m down sizing the tart today and using an 8 inch tart pan instead of the 9 to 10 inch that the recipe is written for.   I like to use this size when I’m making this as an appetizer because it gives nice little small slices and I’m a big believer in small quantities of things that taste great!  

In any case it’s an easy recipe to adjust as exact quantities of ingredients aren’t critical to success.

DSC00609

Roll the crust to approximately 1/8 inch thick and 2 inches in diameter larger than the tart pan or pie plate.

DSC00610

Roll the dough over the rolling-pin and transfer to the center of the tart pan.  Once it’s in place, gently roll the excess crust to the inside of the pan and press into the ridges.  Be careful not to pull or stretch the dough.

DSC00611DSC00612

With the dough in place, line the crust with foil and fill with pie weights.  I keep a bag of beans in my pantry for this.  Just don’t ever try to cook them after they’ve been serving as pie weights as they will never be anything but bean rocks.

DSC00614

Bake the crust with the pie weights in a 450° F oven for  8 to 10 minutes.  Remove the foil and beans and dock (prick) the entire surface of the crust with a fork.  Return the crust to the oven and bake for another 2 to 4 minutes or until it is lightly browned.  If the crust puffs up, gently press down with the fork to release the steam.  This is called blind baking the crust.  It helps keep the crust from becoming soggy during the final baking.

DSC00616DSC00617

Set the crust aside to cool and reduce the oven temperature to 375°F.

Now you’re ready to prep the filling.  Grate the parmesan, shred the mozzarella, thinly slice the tomatoes (if you want you can put them on a paper towel to soak out some of the extra juice), mince the garlic scapes or garlic and chiffonade the basil. 

DSC00626DSC00618DSC00619DSC00620DSC00621

Sprinkle the bottom of the cooled crust with approximately 1/3 of the mozzarella (1/2 cup if you’re making an 9 or 10 inch tart).  Top with tomato slices, basil and minced garlic or garlic scapes.

DSC00622 DSC00623DSC00625

Mix the remaining shredded mozzarella, grated parmesan cheese, the mayonnaise and some freshly ground black pepper and spread over the top of the tart.  Don’t worry if the mixture is thick and won’t spread evenly, it will melt and spread as it bakes.

DSC00627 DSC00628

Bake for 30 to 40 minutes or until golden brown.  You will want to place it on a baking sheet or place foil on the rack under the tart to catch any butter that drips from the tart pan as it bakes.

My favorite trick for removing the rim of the tart pan is to set it over a can and let it gently fall to counter.

DSC00630 DSC00631

Garnish it with a bit more fresh basil and you have a lovely hors d’oeuvre for a summer party or a great brunch dish that only needs a bit of fresh salad. 

DSC00634

DSC00633

The tart was so rich and tasty I didn’t even add any dressing to my salad.  But in hindsight a splash of balsamic would have been lovely.

DSC00636

Bon Appétit!

M.B.

Tomato, Basil & Cheese Tart

Colleen’s “Quiche”

by: M.B. Einerson

Adapted from a recipe given to me by  Colleen 

 Servings: 12 appetizer servings or 4 to 6 entrée servings

  • Pastry for a single 9 to 10 inch pastry crust rolled fit pie plate or tart pan it should be approximately 1/8 inch thick and have a ½ inch overhang
  • 1 ½ cups shredded mozzarella cheese, divided
  • 5 to 6 Roma or small round tomatoes or the equivalent in cherry or grape tomatoes
  • 2 to 4 cloves garlic minced or two garlic scapes thinly sliced.
  • 1 cup loosely packed fresh basil leaves, sliced into a chiffonade, plus more for garnish
  • ½ cup mayonnaise
  • ¼ cup shredded parmesan cheese
  • Freshly ground black pepper to taste

Preheat oven to 450°F

Place unbaked crust in a 9 or 10 inch pie plate or tart pan with removable bottom.  Turn the overhang under and flute or press into the sides of the tart pan.  Line with foil and fill with pie weights.  Bake for 8 minutes.  Remove foil and pie weights, dock the entire crust with fork pricks and bake an additional 2 or so minutes more, until lightly browned.  I the crust has puffed, gently press down with a fork or spoon.  Set aside to cool.

Reduce oven temperature to 375° F.

Cut the tomatoes into thin slices, wedges or halves depending on the type you are using.  You can drain on paper towels if you like but I love the flavor of the juice, so I sacrifice a bit of crispy texture for bigger flavor.

Sprinkle the bottom of the cooled crust with ½ cup of the mozzarella.  Top with tomatoes, garlic and basil ribbons.

Mix the mayonnaise, remaining 1 cup of mozzarella, shredded parmesan cheese and black pepper.  Spread this mixture over the top of the tomatoes.  Don’t worry if it’s a bit thick and won’t spread smoothly or evenly.  As the cheese melts it will spread over the tart.

Bake for 30 to 40 minutes or until golden brown on top.  Cool slightly and serve warm or at room temperature.

Bon Appétit

M.B.


Bloody Mary’s

DSC00597

As I told you last week, the perfect accompaniment to a great cheese soufflé is a Bloody Mary.  The preparation of this one has always fallen into my husband’s hands, so as I’m a bit tied up with gardening and teaching cooking classes this week I’m going to share his version of a Bloody Mary.

The origin of the recipe is a little red volume of  Mr. Boston Deluxe Official Bartender’s Guide New Worldwide Edition.  It’s another of those little gems that has been in our family since the late 1970’s.  The printing we have is the 54th, but the original dates back to 1935, two years after the repeal of prohibition.  A pretty busy two years for the Boston Bartender’s school to amass some 600 recipes (the “new” version has over 1000).   My husband’s version actually combines ingredients of the Bloody Maria (a tequila based beverage) with the Bloody Mary.  I’m not going to vouch for the complete accuracy of all of the measurements because he never measures!   However the measurements are close to those found the Mr. Boston and who’s going to argue with 70 years of success.

The special ingredient for this batch is some of my homemade tomato-vegetable juice, but any good quality tomato or tomato-vegetable juice blend is fine.  

DSC00588

We mix them directly into the glass which makes it easy to personalize each one.  I like mine heavy on tomato and lemon juice.  Start with the ice cubes and vodka and then pour in the tomato juice.

DSC00590

Squeeze in some lemon juice and add a splash of Worcestershire sauce.

DSC00592 DSC00593

Top it off with a few drops of hot sauce , a sprinkle of celery salt and a grinding of black pepper. 

DSC00594 DSC00595 DSC00596

Give it a good stir with a chopstick and taste to see if you need any adjustments.  When you’re happy, insert a stalk of celery.   Now all you have to do is wait for the Camembert Soufflé to arrive at the table.

DSC00597

Cheers!

M.B.


Bloody Mary

by: M.A. Einerson

Adapted from Mr. Boston Deluxe Official Bartender’s Guide New Worldwide Edition copyright 1935, 54th printing August 1974  – Cost $2.50

Servings: 1

  • Ice cubes
  • 1 ½ oz. vodka
  • 3 oz. tomato juice, V-8 juice or a combination of the two
  • ½ tsp lemon juice
  • 1 Tbs. Worcestershire sauce
  • 1 to 2 dashes Tabasco sauce
  • 1 dash celery salt
  • A grinding of black pepper
  • 1 small stalk celery with leaves

Fill tall glass (16 oz.) glass ½ to ¾ full of ice cubes.  Pour in vodka and add tomato juice, lemon juice, and the next 5 ingredients.  Stir well.  A chopstick works well for this job.  Garnish with celery.

Cheers!

M.B.

Camembert Souffle

DSC00599

When I think of this Camembert Soufflé it brings up great memories of brunch on the  gazebo.  At our first home in Southern California we had a beautiful gazebo in the back yard that was the perfect spot for brunch nearly year round and this soufflé was one of my favorite brunch dishes to serve.   Not only was it tasty( the best description I can think of is that it’s like eating a cloud), but I loved the challenge of getting it out to the table before it began its fall from glory.

Needless to say this type of challenge was something I relished before kids arrived on the scene, took over the Gazebo as a playhouse and gave me other challenges.  So it is highly likely they have no memory of it at all.  However , it was always one of their Father’s favorite egg dishes, so in honor of Father’s Day I decided to pull it from the files.   The perfect complements to this dish are a great Bloody Mary (my husband’s department) and a simple green salad lightly dressed in a slightly sweet and tangy vinaigrette.  The bite of vodka and spice in the Bloody Mary, the crunch of the celery stick and the freshness of the salad balance the richness of the soufflé perfectly.

So in honor of Father’s Day I give you Camembert Soufflé.  It was the perfect brunch item to enjoy before the father of my two wonderful children settled in to enjoy the US Open.

Eggs, butter, cheese, milk, a bit of flour, some aromatics and a bit of technique are all that Camembert Soufflé requires.

DSC00554

Start the process of making this cloud of an entrée by separating the eggs.

Eggs are easiest to separate when cold but whip best when warm-so when making anything that requires beating egg whites to a foam,  pull them from the refrigerator, separate them immediately and then proceed with the rest of the recipe.

DSC00558

The other key to success when separating eggs is to use a minimum of 3 bowls.  One bowl to separate over, one bowl to hold the yolks and one bowl for the whites.  In this recipe I used 4 bowls because it uses a total of 7 whites and 5 yolks.  Choose a large bowl for the 5 yolks.

Next preheat your oven to 350° F.  Make sure you have the racks positioned with enough room to allow the soufflé to rise to its max.

Prep your soufflé dish (a minimum volume of 2 quarts) by buttering liberally and sprinkling with finely grated parmesan cheese.  Think of the cheese as a rock climbing wall-it gives the rising soufflé something to hang onto as it begins its ascent up the sides of the dish.   It also give a nice little cheesy crust on the side of the soufflé.  To insure that the “rock wall” is solid-pop the coated dish into the refrigerator while you continue with the recipe.

DSC00552 DSC00553

Next prep the rest of the cheese.  As with eggs, the camembert will be easier to deal with when it’s cold, especially if you have a nice soft, ripe one.  The Parmesan on the other hand is easier to grate when it’s warm.  

Cheese quantities are always tricky, so I usually pull out my kitchen scale.  I used 5 oz. from and 8 oz. wheel of Camembert (we like the rind with a bit of cheese attached to munch on).  In the case of grated Parmesan, my volume measurements never agree with the standard weight to volume listed in most recipes.  In this case I used 1 oz. of finely grated cheese which was approximately 3/4 cup (not the 1/2 cup = 2 oz. that seems to be the standard).  It all depends on the grating, the dryness of the cheese and how tightly you pack the cup.  So weigh it if you can, if not 1/2 cup (tightly packed) to 1 cup (very loosely packed) Parmesan will be fine!

DSC00571

Now for the aromatics.  In this recipe they need to be finely diced.  The easiest and fastest way to dice celery is to make thin slices along the length of the stalk and then thinly slice.  If the scallion/green onion is thin enough simply slice thinly, if it’s a fat one use the same technique you used for the celery.

DSC00564DSC00566

Melt the butter in a heavy-bottomed pot and add the celery, onion and garlic (as always garlic goes in last).  Sauté until the celery is soft and the onion is translucent-do it on low so the butter doesn’t brown.

DSC00567 DSC00568

Stir in the mustard and flour and pepper to make a roux.  Cook for just a few minutes to cook out the raw flavor of the flour, but you want a very blond roux, so again low heat and a heavy pot are key.

DSC00569 DSC00570

Whisk in the milk and cook until thick and bubbly.  

DSC00573

Add the cheeses and whisk until all are melted.  Then remove from the burner and set aside to cool slightly.

DSC00574

Now back to those eggs that have had a chance to warm up.  Be sure to use a large bowl for beating the egg yolks as it will need to hold all of the soufflé mixture. 

DSC00575

Beat the yolks until they are thick and light in color.  This will take approximately 5 minutes with a good hand mixer.

DSC00577

Slowly add the cooled cheese mixture to the beaten egg yolks, whisking as you go (if your cheese mixture is too hot you will get scrambled yolks instead of soufflé base)

DSC00579

Now beat the egg whites to stiff but not dry peaks.  I was concerned that I had gone a bit far with these, but you’ll see in the end, they were nearly perfect!

DSC00578DSC00580

Fold the whites into the yolk/cheese sauce mixture in 1/3 increments.  In the addition of the first third you can be a bit aggressive with the folding but with the 2nd and 3rd additions, fold gently.  Down through the middle, up and over, give the bowl a quarter turn and do it again until combined.  Err on under rather than over mixing.  A few spots of egg white are fine.

DSC00581

Pour the mixture into the prepared soufflé dish.   With a thin spatula or table knife, trace a 1 inch deep circle through the mixture approximately 1 to 2 inches from the edge of the dish.   Gently place in the preheated oven and bake for 40 minutes without opening the oven door.  Hopefully you have a glass door and a light so you can see the magic happening.  

DSC00583

While the soufflé is baking set the table, make a salad and a batch of Bloody Marys -soufflés wait for no one!

DSC00597

At the end of the 40 minutes, carefully open the oven door and if the stuff is tall and nicely browned take it to the table. The original recipe says to check for doneness by inserting a knife in the center while the soufflé is still in the oven but if it looks like this go for it.

DSC00599

Ok so the recipe says that it serves 6, but this is what we had left between the two of us!   When you’re eating a cloud on Father’s day I guess it’s ok !

DSC00604

I think I’ll work on a downsized version soon.

Bon Appétit

M.B.

CAmembert Soufflé

by: M.B. Einerson

Adapted from a recipe in my files that appears to be from a Better Homes and Gardens cookbook circa 1980’s, an updated but similar version can be found on the BH&G website but I still gave it a few tweaks of my own.

 Servings: 6

  • 5 egg yolks – in a large bowl
  • 7 egg whites – in bowl of a stand mixer or a separate metal or glass bowl.
  • 5 oz. camembert cheese*, rind removed and cut into small pieces
  • ½ to 1 cup* grated Parmesan or Romano cheese plus additional for preparing baking dish
  • 3 Tbs. butter
  • ¼ cup finely chopped celery
  • 2 Tbs. thinly sliced green onion
  • 1 small clove garlic, minced
  • 3 Tbs. all-purpose flour
  • 1 tsp. dry mustard
  • Several grinds of black or white pepper
  • 1 cup milk (whole preferred)

Separate the eggs and allow them to come to room temperature.

Butter and sprinkle the sides and bottom of a 2 to 2 ½ quart soufflé dish with finely grated fresh Parmesan or Romano cheese.

Pre-heat oven to 350° F.

Melt butter in a medium size sauce pan.  Add celery, onion and garlic and cook until onion is translucent.  Stir in flour, dry mustard and black pepper and cook for a few minutes on low heat just to cook out the raw flavor of the flour (do not allow to brown).  Add milk all at once and cook and stir until the sauce is thick and bubbly.  Add camembert and grated cheese, stirring to melt.  Remove from heat and set aside to cool.

In a large bowl, beat the egg yolks for 5 minutes or until thick and light in color.  Slowly add the cheese mixture to the yolks, stirring constantly.  Set aside.  Wash beaters well if using them in the next step.

Beat egg whites to stiff peaks.  Fold the whites into the yolk/cheese sauce mixture in 1/3 increments.  In the addition of the first third you can be a bit aggressive with the folding but with the 2nd and 3rd additions, fold gently.  Down through the middle, up and over, give the bowl a quarter turn and do it again until combined.  Err on under rather than over mixing.  A few spots of egg white are fine.

Pour the egg mixture into the prepared soufflé dish.  With a thin spatula or table knife, trace a 1-inch deep circle through the mixture about 1 inch from the edge of the dish.

Bake for 40 minutes or until a knife inserted near the center of the dish comes out clean.  Do not open the oven door during baking.  Test for doneness at the end of the suggested baking time while the soufflé is still in the oven.

Serve immediately as the soufflé will begin to fall as soon as it comes from the oven.

Bon Appétit

M.B.

* Cheese quantities are always tricky, so I usually pull out my kitchen scale.  I used 5 oz. from and 8 oz. wheel of Camembert (we like the rind with a bit of cheese attached to munch on).  In the case of grated Parmesan, my volume measurements never agree with the standard weight to volume listed in most recipes.  In this case I used 1 oz. of finely grated cheese which was approximately 3/4 cup (not the 1/2 cup = 2 oz. that seems to be the standard).  It all depends on the grating, the dryness of the cheese and how tightly you pack the cup.  So weigh it if you can, if not 1/2 cup (tightly packed) to 1 cup (very loosely packed) Parmesan will be fine!

Best Barbecued Ribs

DSC00539

Soon recipes revolving around my CSA (Community Supported Agriculture) share will likely dominate this site for the remainder of the summer, but before that happens I’ll share one more recipe for the carnivores in my life-Best Barbecued Ribs.

When I first started dating my husband he owned two cookbooks The Joy of Cooking and Better Homes and Gardens Cooking for Two-Menus and Recipes for Every Occasion.  Not bad for a guy in the early 80’s.   Maybe this is what let me know that like this recipe he was a keeper!   In any case the recipe  for Best Barbecued Ribs from the section in the Better Homes and Gardens volume titled Remembered Recipes has been in our repertoire for years.  I pre-cook the ribs and make the sauce and he does the grilling.   In my opinion they have just the right blend of tart, sweet and spiciness to make them literally finger licking good.  The only thing I’ve done over the years is to add a touch of chipotle in adobo to kick them up just a bit.  Soon, I may start adding a bit of smoked salt to the brine or the sauce or directly on the ribs before grilling to make up for the fact I’m cooking on a gas grill.

I was so pleased to see that in the May 2013 issue of Cook’s Illustrated the method of preparing the ribs by pre-cooking them in a simmering brine was validated.  I’ve tried a few other methods over the years when  pre-cooking in brine was maligned for reducing the meaty flavor but I always ended up with tough, dry ribs.   As indicated by Cook’s and evidently known by Better Homes and Gardens cooks in 1968, gently simmering the ribs in a brine allows the collagen in the ribs to break down and results in tender, flavorful ribs that only need another few minutes on the grill to give them a bit of a char and some caramelization to the sauce.  Okay, so the cook times in the original Better Homes and Gardens recipe were a bit longer, but that was in the era when we still worried about trichinosis!

For those of you who are big city dwellers with no grill, have no fear!  My mother makes this recipe often using the baking method and loves them-it’s all about the sauce.

It starts with some nice meaty ribs and a few ingredients that are most likely in your pantry.  The Chili Sauce is usually the only ingredient that I have to buy.

DSC00512

Cut the ribs into pieces that will easily fit in a large stock pot or Dutch oven.  Simmer in salted water until tender.  The amount of time will vary depending on the type of ribs you have chosen.

DSC00529

While the ribs are simmering make the sauce.  Note that the onion should be a fine dice and remember to remove all of the seeds from the lemon slices. 

DSC00516 DSC00517

All of the ingredients go into the sauce pan together.

DSC00522

An easy trick to getting all of the chili sauce out of the bottle is to rinse with the Worcestershire sauce.

DSC00518 DSC00520

Bring the sauce to a simmer and cook for 5 to 10 minutes

DSC00525

After the sauce is done.  Remove the lemon slices-this is especially important if you are making the sauce ahead and refrigerating.  Once I left them in and the sauce became quite bitter.  Don’t toss them though, they still have a role to play.

DSC00526

Pre-heat your grill to medium-high and put the ribs on with the bony side up.  Top with the reserved lemon slices-they have a lot of good sauce on them and this is the best way to use it.

DSC00531

Grill for approximately 4 to 5 minutes on this side with the lid down to give the meaty side a nice crust.

DSC00533

Remove the lemon slices, flip the ribs and brush liberally with sauce. And grill with the lid down for another 4 to 5 minutes or until the ribs are hot and the sauce is slightly caramelized.

DSC00535DSC00536

Transfer to a cutting board and cut between the ribs into serving pieces-be sure to have plenty of napkins on hand.  Serve with the extra sauce on the side-my husband says it’s so good you could drink it.

DSC00538

My favorite sides -Aunt Mary’s (Grandma Alice’s) Potato Salad or Cole slaw and of course a glass of red wine!

DSC00500DSC00541

Enjoy!

M.B.

Best Barbecued Ribs

by: M.B. Einerson

Barely adapted from Better Homes and Gardens Cooking for Two

1968 First Edition Sixth Printing 1972 

I don’t believe we ever made the two serving version of this recipe, the leftovers are nearly as good as fresh.  In the early days we doubled the original sauce recipe to make one rack of ribs (usually between 3 and 4 lbs) which is enough to feed 4 people easily.  In later years I scaled it up to use exactly one 12 oz. bottle of chili sauce. Any leftover sauce can be frozen for the next round of ribs.  If you want to make a smaller batch you will find my 2x of the original recipe below.  This will be enough for one rack of ribs with some extra sauce for serving at the table.

Servings: 4 with extra sauce for the freezer

  • 2 to 4 lb. ribs – We’ve done spareribs, baby back ribs and Kansas City style ribs-baby backs and Kansas City style are my favorite.
  • 2 cups catsup
  • 1 cup chili sauce (one 12 oz. bottle)
  • ½ cup brown sugar
  • ½ cup finely diced onion
  • ⅓ cup prepared mustard
  • ½ cup butter
  • 8 tsp. Worcestershire sauce ( 2 Tbs. + 2 tsp)
  • 1 tsp. garlic salt, ¼ tsp. garlic powder or 2 cloves minced fresh garlic
  • 16 thin lemon slices ( two lemons)- don’t forget to remove all the seeds
  • Chipotle in adobo sauce to taste

Cut ribs into pieces that will fit easily in a large stock pot or Dutch oven.  Simmer in salted water (approx. 1 tsp. of Kosher salt per quart of water is fine) until tender.  This will take anywhere from 15 to 25 minutes for baby back ribs to 30 to 45 minutes for spareribs.  This can be done a day ahead.  Remove from water and go directly to the grill or oven* (I’ve personally never baked them, but someday I’ll give it a try) or refrigerate for up to 2 days.

In a medium size saucepan add all remaining ingredients and bring to a simmer. Simmer for 5 to 10 minutes.   Remove from heat and remove lemon slices.  Reserve the lemon slices for use during grilling.

Grill hot ribs over medium to low heat until browned on both sides (for us this is usually 4 minutes per side –but it will depend on your grill, the outside temp. etc.).  Brush with sauce during the last few minutes of grilling-otherwise the sauce will burn.

* Place hot ribs in a shallow roasting pan and cover with sauce.  Bake in 350° oven for 20 to 25 minutes, basting with sauce occasionally.  If ribs have been refrigerated, allow them to come to room temperature before baking.

Enjoy!

Best Barbecued Rib Sauce- Small Batch

by: M.B. Einerson

Barely adapted from Better Homes and Gardens Cooking for Two

1968 First Edition Sixth Printing 1972 

  • 1/2 cup catsup
  • ¼ cup chili sauce
  • 2 Tbs. brown sugar
  • 2 Tbs.finely diced onion
  • 4 tsp. prepared mustard
  • 2 Tbs. butter
  • 2 tsp. Worcestershire sauce
  • ¼ garlic salt,  116 tsp. garlic powder or 1 small clove minced fresh garlic
  • 4 thin lemon slices- don’t forget to remove all the seeds
  • Chipotle in adobo sauce to taste 

In a small saucepan add all remaining ingredients and bring to a simmer. Simmer for 5 to 10 minutes.   Remove from heat and remove lemon slices.  Reserve the lemon slices for use during grilling.


Kim’s BBQ Brisket

DSC00509

This BBQ Brisket recipe is a throw back to my graduate school days.   While most of us didn’t do a lot of cooking while in graduate school, especially big hunks of meat like beef brisket-limited funds and time were a bit of an issue.  I was lucky enough however to be friends with a couple who invited me to dinner one evening and served this brisket.  It was falling apart tender and loaded with flavor.  Needless to say I’ve been making it ever since.

The recipe in my files is rather cryptic with limited instruction and few quantities listed.  It’s so simple and I’ve made it so many times over the years that I often don’t even bother to pull it out of the file.  However,  for this post I attempted to measure and record a bit more of the “technique”.  I have to admit, however, that I’m not sure this was the best I’ve made (even though my husband declared it the best ever – it’s been a while since I’ve made it, so this could be the explanation for this).  So whether you decide to measure or simply sprinkle and splash I don’t think you can go wrong.

If you are a Smoked Brisket connoisseur you will likely be dismayed with the use of liquid smoke.  But please don’t dis it until you’ve tried it.  Liquid smoke is actually a natural product made by channeling smoke from smoldering wood chips through a condenser, which quickly cools the vapors, causing them to liquefy (just like the drops that form when you breathe on a piece of cold glass). The water-soluble flavor compounds in the smoke are trapped within this liquid, while the nonsoluble, carcinogenic tars and resins are removed by a series of filters, resulting in a clean, smoke-flavored liquid.(courtesy of Cook’s Illustrated Magazine September 2007).  Look for one like Wright’s that is just water and liquid smoke concentrate.  It’s an original that has been in production since 1895, when Ernest H. Wright a pharmacist in Kansas City, Missouri began bottling and selling the stuff.    So hailing from Kansas City and having the blessing of Cook’s Illustrated gives it a bit of street cred,  but best of all it allows you to have some great brisket with little effort and no equipment required beyond a large oven safe baking dish, some aluminum foil and an oven.

One 5 lb. beef brisket, a few flavorings and some BBQ sauce and a couple of days are all that are between you and some delicious Smoked BBQ Brisket.  

DSC00462

On day 1, sprinkle the brisket with celery salt, onion and garlic (powder or granulated) and douse it with liquid smoke.  Cover it with plastic wrap and refrigerate overnight.

DSC00465

When your ready to cook it pre-heat your oven to 275°F,  add the Worcestershire sauce and some freshly ground black pepper and cover tightly with foil. 

DSC00468

 I start the cooking with the fat cap side down.  Start a timer for 5 hours-low and slow is the key to cooking a cut of meat like brisket.

DSC00469

Some time about half-way through the cooking process (your nose will generally give you an indicator) I flip the brisket over to put the fat cap on top.  If you wait too long it will be more difficult to turn.  I baste the top with some of the juices that have begun to collect in the baking dish, cover it tightly with the foil once again and back into the oven it goes.

DSC00496

At the end of 5 hours it should be tender and look like this.

DSC00494

Spread it with some BBQ sauce (I’ve tried many over the years and all work fine-I just avoid those with smoke flavor.  You have plenty of it already).  If the brisket seems very tender you can continue to bake it uncovered (you may need to add a bit of water) or if it seems to need a bit more tenderization (check this by poking and pulling a bit with a fork) recover tightly with the foil.  Bake for 1 more hour.

DSC00498

At this point it’s ready to eat, but there will be a generous layer of fat floating on top of all those great juices.  If I’ve allowed enough time, I like to refrigerate it over night.  It’s then very easy to lift off the solid fat.  If not simply take a small ladle or large spoon and skim off as much of the fat as you can.

DSC00506

If it’s refrigerated, I pop it back into a low oven (275° to 300°) oven to warm or if I’m in a hurry I pop it into the microwave.  It’s much easier to slice when warm/hot.  Slice it and pop it back into the dish with all of those lovely juices.  If you want a thicker sauce you could put the drippings into a sauce pan and reduce them, but I like the thinner  natural jus.

DSC00507

And yes, all it needs of some of Aunt Mary’s (Grandma Alice’s) Potato salad on the side.  It also make a great sandwich with the addition of a slice or two of dill pickle.  

DSC00508

Enjoy,

M.B.

BBQ Brisket

by: M.B. Einerson

Barley Adapted from Kimberly Mattox Wahl  

Servings: 10 at least- and the leftovers are great, but you can make a smaller brisket by buying a smaller brisket.

  • 5 to 6 lb. trimmed beef brisket
  • 2 to 3 oz. liquid smoke (choose a brand that is simply  water and liquid smoke concentrate)
  • Celery Salt (1/2 tsp. per side)*
  • Onion powder (1 tsp. per side)*
  • Garlic powder (1 tsp. per side)*
  • Worcestershire sauce (1 Tbsp. per side)*
  • Black Pepper
  • 6 to 8 oz. Prepared BBQ sauce – I choose one without any smoke flavor added

Place brisket in a large glass baking dish.  You can usually fit a 5+ lb. brisket in a 9 x 13 inch pan.  Sprinkle both sides with liquid smoke, celery salt and powders.  I put the fatty side up.  Cover with plastic wrap and refrigerate overnight.

Remove brisket from the refrigerator and heat oven to 275°F.

Sprinkle with pepper and Worcestershire sauce.  Cover tightly with foil and bake for 5 hours.  I generally start it with the fatty side down and turn after 2 ½ hours or so.  At this point it will still be firm enough to turn easily.

Uncover and pour BBQ sauce over the meat and bake another hour or until the meat is very tender.  If leaving uncovered you may need to add up to 1 cup of water.

If I’ve allowed enough time, I refrigerate overnight so I can easily remove the excess fat.  If you want to eat it on the day of baking you can skim much of the excess fat from the broth with a large spoon or small ladle.

* the original recipe had no measurements for these and until I was preparing for this post I never measured, just sprinkled liberally and it was great each and every time.  In fact I think it was perhaps even better!  So give it a try.

Enjoy,

M.B.

Aunt Mary’s (Grandma Alice’s) Potato Salad

DSC00493

For years this recipe has been in my Tried & Liked recipe file titled Aunt Mary’s Potato Salad.  It wasn’t until I asked permission to use it in this post that I learned that it was actually my mother-in-law’s recipe.  Where she got it will likely go unrecorded, perhaps it was once on the back of a Miracle Whip jar.   What I do know for sure is,  that for my money this is the quintessential American potato salad.  I have many potato salad recipes in my files and while many of them are very good, this is the one I always go back to for picnics, potlucks and when I’m simply craving potato salad.  So on this Memorial Day out came this classic recipe once again.  Thank you Grandma Alice!

Now in the last few years I’ve lightened it up a bit by switching out some of the Miracle Whip for low-fat cultured buttermilk.  I don’t think Alice would disapprove however as she is the daughter of a Land O’ Lakes butter maker and buttermilk Is an ingredient  she loves.  She and her son have been known to drink it by the class full.

I’ve also traded the sweet paprika garnish for the more flavorful smoked Spanish variety.   Other than that it’s the same recipe I’ve been making for going on 30 years.

OK so early on I tried to mess with it.   Our home is one of those split into the Salad Dressing camp and the Mayo camp.  I’m definitely on the Mayo side of the fence in everything but this recipe.  So,  if you are a mayo person as well,  let me save you some trouble-just use the Miracle Whip.  I also tried to get fancy and use Dijon mustard-again great stuff but not in this one, trust me.

The ingredients are mostly pantry/refrigerator staples.

DSC00470

Start by hard boiling the eggs – I always make a few extra for the munchiers in my family.  While I’m making potato salad I usually stir up some tuna salad as well.  Yes ,there are many ways of properly hard boiling eggs-my favorite is the egg timer.  It turns out perfectly cooked eggs every time (just as long as you keep don’t try to do too much multi-tasking and keep an eye on it).  Also note that older eggs are easier to peel than super fresh ones.

DSC00472

 Next start cooking the potatoes.  For potato salad you need a waxy potato that will hold it’s shape when cubed.  I like red-skinned, but Yukon Gold’s work well also.  They are a bit less waxy than red skinned potatoes but have an excellent flavor.

The important cooking technique is to start them in cold water.  If you put potatoes into hot or boiling water, the outside will turn to mush before the inside is cooked.  Add the salt either at the beginning or after the water comes to a boil.

DSC00474

The eggs are done when the “timer” turns completely dark-so you do have to keep a watchful eye on it.

DSC00476

Immediately pour off the hot water and add cold water from the tap until the eggs are cool to the touch (the egg timer will help you out here as well).  Then peel the eggs by tapping them against the side of the pot under water.  The water going into the shell will aid you in achieving a beautiful smooth egg.

DSC00477

The potatoes are done when you can easily slide a sharp knife into the center with little resistance.

DSC00478

Pour the potatoes into a colander and cool under cold running water. 

DSC00480

While the potatoes are cooling you can start to chop the veggies.  The size of the dice is up to you.  Some people like the celery in bigger chunks so it is easier to pick out!  I usually slice the stalk in half lengthwise and then cut into pieces about 1/4 inch wide.

DSC00481

Once the potatoes are cool enough to handle, cube into bite size chunks.  The original recipe calls for peeling them as well, but I like the flavor, fiber and ease of leaving the peeling on.

DSC00482

The original recipe also says the onions are optional, but I almost always add green onions/scallions.  The relish for this one is sweet (I’ve tried to use dill because I love it in other dishes, but it doesn’t work in this one).

DSC00483

Gently mix the celery, onion and relish with the potatoes.

DSC00485

Mix the Miracle Whip, Buttermilk (optional), Yellow Mustard, Salt and Pepper.  

DSC00486DSC00487

Pour the “dressing” over the potato mixture and add the sliced or chopped eggs.  Yep, I love gadgets that work and like my egg timer an egg slicer does a fine job here.  I leave the slices whole and let them break up as I stir them in.  Don’t forget to save one or two for the garnish.

DSC00489

The dill in my “garden” is going great guns at the moment so I’ve added a bit of that for a bit of fresh flavor.  

DSC00503DSC00490

Like the dill,  my chives are also in abundance so instead of parsley (which the bunnies and chipmunks have lunched upon) they become the extra bit of green on top to contrast the red of the paprika.

DSC00504DSC00492

Coming soon –  Brisket a great side to the potato salad!

DSC00508

Thanks again Grandma Alice for sharing this one.

M.B.

Aunt Mary’s (Grandma Alice’s) Potato Salad

by: M.B. Einerson

 Adapted from the original by Alice Einerson and perhaps her mother before her!

 Servings: 6 to 8 large

  • 7-8 medium red skinned potatoes
  • 2 tsp. salt for cooking potatoes
  • 5-6 hard boiled eggs, sliced or chopped
  • Onion, finely chopped – yellow or green-optional (not – it always goes in mine)
  • 3 stalks celery, chopped as you like it – some would consider this ingredient optional!
  • ½ cup sweet pickle relish
  • 1 ½ cups Miracle Whip – in recent years I’ve started to go with a 50/50 blend of Miracle Whip and cultured Low fat buttermilk but no substitutes for the Miracle Whip!
  • 2 Tbsp. Yellow prepared mustard
  • 1 to 2 teaspoons salt
  • Freshly ground black pepper to taste
  • Fresh dill, chopped (optional)
  • Fresh chives or parsley, minced or snipped
  • Sweet or Smoked Paprika

Place potatoes in a pot large enough to hold potatoes and cover with an inch or so of cold water.  Add 2 tsp salt and bring to a boil.  Boil 30-35 minutes until just tender.  You can check by poking a paring knife into the potato.  If it goes to the center with just a little resistance, they are done.  Pour the potatoes into a colander and run cold water over them to stop the cooking.  To peel or not to peel?  The original recipe specifies peeling, but I like the flavor, fiber and other nutrients that come from the peel, so I save a bit of work and leave it on.  When the potatoes are cool enough to handle, cube into the size you prefer.  I leave it on the chunky side because that’s the way I like it.

Add the onion, celery and pickle relish and mix gently.

Combine the Miracle Whip, (buttermilk if you’re using it), mustard, salt, dill and pepper.  Pour over the potatoes.  Add the eggs, reserving some for garnish.  Mix gently.  Garnish with additional dill, chives or parsley, paprika and reserved eggs.

Enjoy

M.B.

Missouri Goulash

DSC00457

In Missouri we simply called it Goulash and in the era before packaged and processed foods took over what could be put on the table in a hurry,  it was the easiest meal to prepare from staples always on hand in our home – ground beef taken from the freezer, home canned tomato juice, elbow macaroni, salt and pepper.

To this day,  as much as I love exotic ingredients and recipes from around the world, this is wonderful comfort food for me.  I guess you could call it one of my guilty pleasures because it fits, in a way,  the definition of  foods that one enjoys and considers pleasurable despite feeling  somewhat embarrassed for liking  it so much.  Not that I really feel guilty about it.  No, it’s not sophisticated in the least but it does contain three of the groups on “My Plate”, can be on the table in the time it takes to boil a pot of water and cook pasta and dirties exactly two cooking vessels and a couple of spoons.  There is not even a knife or a cutting board to wash.

If you search the net you will find all sorts of variations on the theme – American Goulash, American Chop Suey, Johnny Marzetti and one I found on Epicurious called Macaroni À La Gisolif.  This one of course it got dissed by some reviewers for not being  sophisticated enough to make an appearance it on the site –  and it had onion, green pepper and Italian seasoning added!   They would really have a field day with my stripped down version.  Other reviewers however,  got it and recounted their versions and memories of this way before Hamburger Helper staple.  Over the years I’ve occasionally added some onion to the ground beef and perhaps a dash of hot sauce but my favorite is the still the bare bones one I grew up on and I get no complaints when I  say” we’re having Goulash for dinner”.  We don’t have it often these days -too many things to try, but when we do I enjoy every mouthful.  Sometimes it’s the simple things prepared with love that are the best and most remembered.

This is it –  Elbow Macaroni, Tomato Juice, Ground Beef, Salt & Pepper 

DSC00444

Heat water to boiling and when it comes to a boil add the salt

DSC00450

While your waiting for the water to boil, start browning the ground beef (I use an 85/15 or 90/10 lean to fat content-then I don’t have to worry about draining off any fat).  Season with several grinds of black pepper.

DSC00448

When the water comes to a boil stir in the elbow macaroni (yes you can use other pasta shapes but the elbows are perfect for curling around the ground beef and soaking up the tomato juice).  I have switched to whole grain-if you haven’t made the switch, this is a great recipe to give it a try.  Cook the pasta to a minute or two less than the al dente directions on your package.

DSC00452

By this point the ground beef should have lost its pink color and started to brown nicely.   Stir in the tomato juice-I’m lucky to still have a few quarts of the juice I canned last summer, but any tomato juice will do.   Reduce to a simmer and let it bubble away until the macaroni is ready.  

DSC00451

To save from getting a pasta steam facial and washing a colander, I scoop the pasta directly into the meat sauce. 

DSC00454DSC00455

Continue to cook until the macaroni is your desired degree of doneness.   Taste and adjust the salt and pepper level-I almost always add a few more grinds of pepper.  The salt will depend on the tomato juice you use and the amount of salt you prefer. 

DSC00456

This batch is a bit on the watery side, partially due to my homemade juice and the fact I was so hungry for my “guilty pleasure” that I didn’t allow the meat sauce to simmer just a bit longer!!

DSC00461

I hope you enjoy this “recipe without a recipe”-nothing measured or timed until preparing for this post,  just learned from the previous generation and now passed to the next  with love.

M.B.


Missouri Goulash

by: M.B. Einerson 

 Servings: 4 generous

  • 3 quarts water (the measurement isn’t super critical, but you want enough to allow the pasta to move freely in the boiling water)
  • 2 Tablespoons salt
  • 6 to 8 oz. elbow macaroni (depending on the shape of the elbows this will be 1 ½ to 2 cups) – I’ve switched to whole grain, but the classic is with the good old white pasta
  • 1 lb. ground beef – I usually use an 85/15 or a 90/10 so I don’t need to drain off fat
  • Freshly Ground Black Pepper
  • 1 quart (32 fluid oz.) tomato juice
  • Salt to taste ( if you salt your pasta cooking water and use regular sodium level tomato juice you will likely not need any additional salt)

Fill pan with water and bring to a boil.  Once the water has come to a boil add the salt.

Meanwhile begin browning the ground beef in a large skillet over medium to high heat (I like my wok skillet for this, but any large cooking vessel that will hold 3 quarts or so will be fine).  Break it up as you put it into the pan or simply dump it in and break it up as it begins to cook with a spoon or potato masher etc. Season with several grinds of black pepper.

When the meat begins to lose its pink color drop the macaroni into the boiling water.   Give it a good stir to make sure the elbows don’t clump together.  Cook the macaroni a minute or two less than the al dente directions on your package.

When the meat is nicely browned, add the tomato juice to the skillet and stir.  Reduce heat to simmer if you haven’t already and let it bubble away until the macaroni is ready.

When the macaroni is ready, drain and add to the meat sauce or using a slotted spoon, spider etc. scoop it directly into the meat sauce.  Stir and cook until the macaroni is your desired degree of doneness.  Taste to check for doneness and to adjust salt and pepper level.

M.B.

Mexico City Enchiladas

When I say “I’m thinking of making a batch of enchiladas.” the first thing my husband says is “Mexico City Enchiladas?”  What last weeks Chicken Enchilada Verdes lack in authenticity, Mexico City Enchiladas make up for in spades.

DSC00438

The source is another of my go to cookbooks – Mexican Cooking by Cynthia Sheer.   It’s one I gave to my then “boy friend-to become husband” for Valentines Day because it had a recipe for Huevos Machaca.  I’m not sure we ever actually tried to make it because nothing could ever live up to the dish as served at Manuel’s Original El Tepeyac  in Boyle Heights, Los Angeles.  If you are ever in LA, it is a place you should try to  visit.  Their claim to fame was the  MANUEL’S SPECIAL BURRITO made with Original Chile Verde Pork It weighed in at 5 lb. and would easily feed a family.   But it was the #9 Machacha dinner that was my favorite.  I loved leaving the line for entry (and there was always a long one) to watch the chef’s sauteeing the shredded beef with  onions, tomatoes, jalapeños, eggs & melted cheddar cheese.  It was their beef that made the dish so unique-aged and air-dried and produced in the northern part of Mexico.  My mouth waters just with the memory.

Even though I never made the Huevos Machaca from Mexican Cooking,  I have made many of it’s recipes and this enchilada is likely the most repeated.   It’s not quite as labor intensive as the Chicken Enclilada Verdes and is certainly a leaner, healthier dish.

The ingredients are pretty basic-Chicken ,spices, onion & garlic, chilies, tomatoes, tortillas and cheese.

DSC00404

I love that this recipe starts with a whole chicken!  Of course you can start with pre-cut chicken parts (no boneless, skinless please) but a whole chicken is a good deal (often under $1.00/lb) and there is just something satisfying about mastering the art of cutting up the bird.   It doesn’t have to be pretty, you just need to get it into manageable pieces that will cook evenly. 

I like to use both a chef’s knife and a pair of kitchen shears on a cutting board with a trough to catch the juices.

DSC00407

Position the bird with the tail toward you.  Pull the leg/thigh away from the body and slice through the skin and flesh until you get to the joint.  You should be able to pop it and cut through the center of the joint with your knife or the shear.   Repeat this same process with the wing.  

DSC00408DSC00409DSC00410DSC00411

Turn the bird over on its breast and using shears, cut through the fine rib bones on both sides of the back.  This will give you one long piece of mostly bones that will give your dish tons of flavor.  You should be able to see the spot where you can cut it into two pieces.  Then cut along the breast bone/cartilage to cut the breast into two pieces.

Like I said, it doesn’t need to be pretty, it just needs to be cut so it can fit into your pot in one layer.

Sprinkle it with salt, cumin, Mexican oregano and red pepper.

DSC00413

Add chopped onion, fire-roasted chilies

DSC00414

then the tomatoes and their liquid and the tomato sauce.  Bring to a boil, reduce to simmer, cover and cook for 1 1/2 hours or until the chicken is very tender.

DSC00415DSC00418

Using a slotted spoon, remove the chicken from the sauce.  I put it into the dish I will use to bake the enchiladas. 

DSC00421DSC00422

While the chicken is cooling, puree the cooking liquid into a smooth sauce with an immersion blender, food processor or blender.   Be careful if you are transferring to a blender etc. and be especially careful if blending a hot liquid.  I highly recommend investing in an immersion blender!  If the sauce seems very thin at this point, bring it back to a simmer and reduce to the consistency of tomato sauce.

DSC00424DSC00425

 When the chicken is cool enough to handle, remove the skin and bones and shred into bite size pieces – you should have about 3 cups of chicken.  Add the tomato, onion and juice that was clinging to the chicken pieces to the bowl with the shredded chicken.  Then stir in 1/2 cup of the blended sauce.

  DSC00429DSC00430

Back to the baking dish that was holding your cooling chicken.  Pour 1 cup of the remaining sauce into it and spread in an even layer.

DSC00431

Today I’m using blue corn tortillas because they caught my eye when I was in the Mexican market, but any corn tortilla will do.  If you can find some that are produced near you go for it, they will be much fresher.  

Instead of the traditional method of heating the tortillas in oil prior to filling, I give them a quick dip in the remaining simmering sauce.  Dip them just long enough to make them soft and pliable.  Alternative is to heat a stack of six for 30 seconds or so in a microwave.

Fill each tortilla with approximately 1/4 cup of the chicken mixture

DSC00432DSC00433

Roll or fold in half and place arrange on top of the sauce in the baking dish. Cover enchiladas with some of the remaining sauce.  I like to keep a bit of extra sauce for serving. Bake, uncovered until bubbly and heated through, 20 to 25 minutes.

DSC00434

Sprinkle with crumbled cheese and thinly sliced red onion and a little cilantro if you like

DSC00436 DSC00437

A few chips, some black beans, fresh tomato, avocado, a dollop of sour cream and of course a margarita Yum!!  And best of all I’ve got great leftovers for lunch or dinner tomorrow.  

DSC00440 DSC00441

 Provecho!

 M.B.

Mexico City Enchiladas

(Enchiladas Mexicanas)

by: M.B. Einerson

 Adapted from Mexican Cooking by Cynthia Scheer 

Servings: 6 generous

  • 1 whole frying chicken, cut up or chicken parts 2 ½ to 3 lbs.
  • ½ tsp salt
  • ¾ tsp ground cumin
  • ½ tsp crumbled oregano (Mexican is best)
  • 1 medium to large onion, chopped
  • 1 small dried red pepper, crushed or ¼ to ½ tsp crushed red pepper flakes
  • 1 to 2 cloves garlic, minced or pressed
  • 1 can green chilies – 4 to 7 oz. depending on your taste
  • 1 – 14.5 oz. can diced or whole peeled tomatoes (the original recipe used a 1 lb. can where oh where have those extra two ounces gone)
  • 1 can tomato sauce the original recipe calls for an 8 oz. can, but I use a 15 oz. can because we like lots of sauce. When I can find it, I substitute a Mexican tomato sauce called El Pato.
  • 12  corn tortillas
  • ½ to 1 cup crumbled Queso fresco , Feta or shredded Monterey Jack cheese
  • 4 thin red onion slices, separated into rings (optional)
  • Cilantro (optional)
  • Sour cream, Mexican crema or crème fraiche (optional)
  • Avocado (optional)

Arrange chicken pieces in a layer in a large skillet or Dutch oven.  Sprinkle with salt, cumin, oregano, chopped onion, red pepper, garlic and green chilies.  Pour on the tomatoes and their liquid and the tomato sauce.  Bring to a boil, reduce heat, cover and simmer for 1 ½ hours or until the chicken is very tender.  Using a slotted spoon, remove the chicken from the sauce.

Pre-heat oven to 375° F

While the chicken is cooling, puree the cooking liquid and solids into a smooth sauce with an immersion blender or in a food processor or blender.  No worries if you don’t have one of those power tools, a chunky sauce will taste mighty fine as well.

When the chicken is cool enough to handle, remove the skin and bones and shred into bite sized pieces.  You should have about 3 cups of chicken.  Add any of the tomato, onion and juice that was clinging to the chicken into the bowl with the shredded chicken.

Mix ½ cup of the reduced sauce with the chicken.  Pour 1 cup of the remaining sauce into an ungreased 9 x 13 inch baking dish.

Dip the tortillas one at a time in the remaining hot sauce to soften slightly and fill each with approximately ¼ cup of the shredded chicken.  Roll or fold in half and arrange on top of the sauce in the baking dish.

Cover enchiladas with some of the remaining sauce. I like to keep a bit of extra sauce for serving. Bake, uncovered until bubbly and heated through, 20 to 25 minutes.  Sprinkle with cheese, red  onion and cilantro.  Serve with sour cream and avocado and extra sauce.

Provecho!

M.B.